Pure white means one specific thing: every pixel in the background reads 255, 255, 255 in RGB, or #FFFFFF in hex. To get there, you remove the existing background, drop the cutout onto a solid white layer, then verify the result with an eyedropper instead of trusting your eyes. The fastest route for most people is EditorAI, where you describe the change in plain language ("replace the background with pure white") and get the cutout and the white fill in one pass, so you are not stitching together a background remover, a fill tool and a color picker. Lightening a gray background with the brightness slider looks similar on screen but almost never produces true #FFFFFF, which is why marketplace listings get rejected and headshots look dingy next to properly edited ones.
Why "looks white" and "is white" are different
Open any photo shot against a white wall or a white sweep and sample the background with a color picker. You will almost certainly see values like 238, 240, 243 or 246, 244, 239. That is light gray with a color cast, not white. Three things cause it:
- Underexposure. Cameras meter for middle gray, so a frame dominated by white gets pulled down. The backdrop renders gray unless you deliberately overexpose it.
- Falloff. A single light source is brighter near the subject and dimmer at the frame edges, so the background is a gradient rather than a flat tone.
- Color cast. Warm indoor bulbs push the white toward yellow, window light pushes it toward blue, and a colored wall nearby bounces its own hue onto the backdrop.
None of these are visible side by side with other slightly-off-white images. They become obvious the moment your photo sits next to a genuinely white one, which is exactly what happens in a product grid, a team page or a slide deck. A tile that reads 242 gray next to nine tiles at 255 looks dirty, and most viewers notice without being able to say why.
The two ways to get a white background
There are only two real approaches, and picking the right one saves a lot of time.
Replace the background. The AI separates your subject from everything behind it, discards the original background, and fills the empty space with solid white. This is the approach to use for product shots, headshots, ID photos and anything that needs to be consistent across many images. It gives you true #FFFFFF because the white is generated, not corrected.
Blow out the existing background. You keep the original pixels and push the light tones up until they clip to white, usually with a levels or curves adjustment where you drag the white point left. This works only when the background is already bright, evenly lit and clearly separated in tone from your subject. It preserves natural shadows under the product, which is a real advantage for furniture or food, but it will also eat detail in any light part of your subject. A white shirt, a pale handbag, blonde hair and a chrome bottle cap all suffer.
In practice, replacement handles perhaps nine out of ten cases, and blowing out the background is a specialist move for images where contact shadows matter more than edge precision.
Step by step: change the background color to white
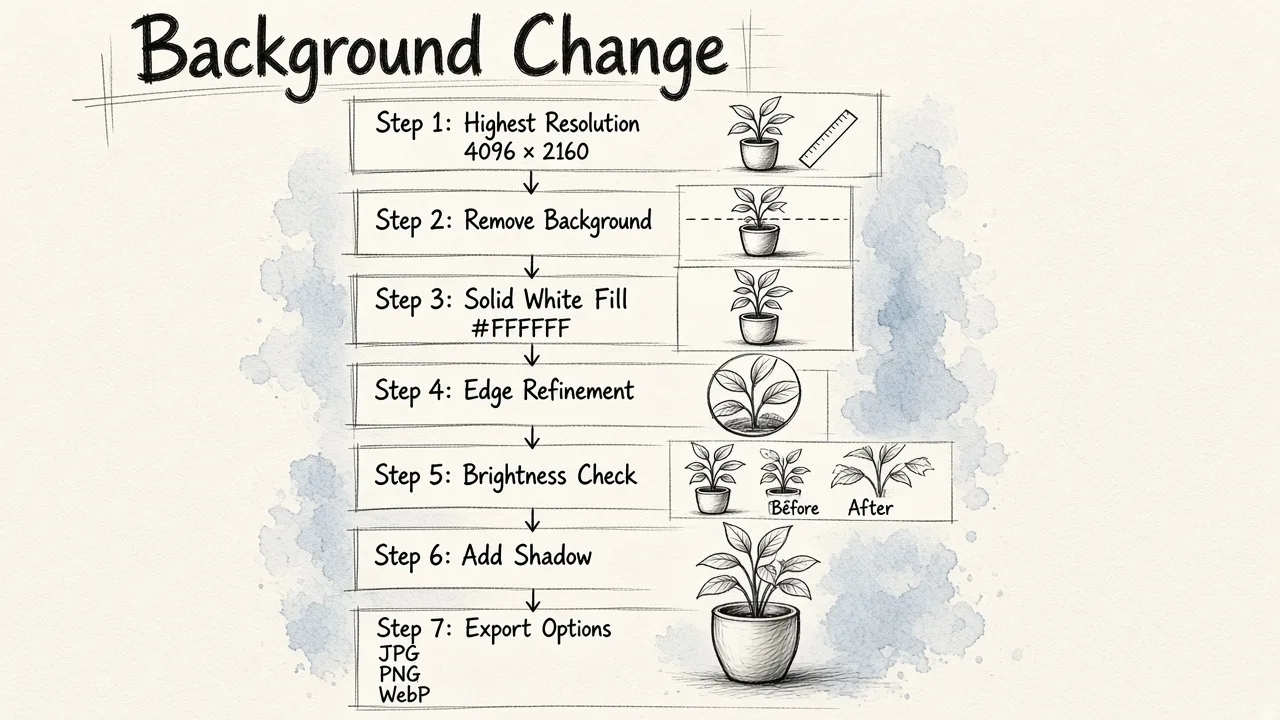
The flow below is roughly the same in every online editor worth using, including EditorAI.
1. Start from the highest resolution file you have. Segmentation models build a better mask when they have more pixels to read. Do not resize down first. If you need a smaller final file, resize at the end with an image resizer so you are shrinking a clean cutout rather than asking the AI to find edges in a compressed thumbnail. Check file limits before you upload too, since browser tools typically cap uploads somewhere between 40MB and 100MB and some reject images under 512 pixels on a side.
2. Remove the background. Either click the background removal action or, in a prompt-based editor, type what you want. Current tools use segmentation models in the Segment Anything family to find object boundaries at the pixel level, which is why this now takes two or three seconds instead of an hour with the pen tool. Review the result at 100 percent zoom before moving on.
3. Set the new background to solid white. Choose the color fill option and enter the hex value #FFFFFF or RGB 255, 255, 255 rather than clicking a swatch labeled "white" in a palette. Palette swatches are sometimes off-white by design, especially in template libraries built for print.
4. Refine the edges. Add one to three pixels of feathering. A completely hard edge against white reads as a cutout, and too much feathering leaves a gray halo where the old background color bleeds into the transition. If your tool offers a decontaminate or defringe option, turn it on, since it strips leftover background color from semi-transparent edge pixels.
5. Check the subject against white. Backgrounds change the apparent brightness of everything in front of them. A subject that looked correct on gray often looks slightly dark on white. Small brightness and contrast lifts fix this, and a simple online photo editor is enough for that step if you only need exposure, contrast and color adjustments.
6. Add a shadow if the subject needs grounding. Products floating in white space look unconvincing. A soft drop shadow or a faint elliptical contact shadow under the base restores the sense that the object is sitting on a surface. Keep it light, around 10 to 20 percent opacity, or you have traded one obvious edit for another.
7. Export correctly. JPG for marketplace listings and web use, PNG if you need the subject on transparency for later compositing, WebP if your site supports it and you want smaller files. Save at maximum quality and avoid re-saving the same JPG repeatedly, since each pass adds compression artifacts that show up first against flat white.
How to verify the white is actually pure
Never judge white on an uncalibrated screen at partial brightness. Use one of these checks instead.
- Eyedropper, four corners plus center. Sample five points in the background. Every reading should be 255, 255, 255. If one corner reads 250, your fill did not cover the whole canvas or an adjustment layer is sitting on top of it.
- Place it on a white page. Open the exported file in a browser tab with a white page background. Any difference in tone shows up instantly as a visible rectangle.
- Zoom to 400 percent on the edges. This is where you catch gray halos, jagged hair and leftover fringe from the original background.
That last check is the one most people skip, and it is the one that separates a usable image from an obviously edited one.
The hard cases, and what to do about them
Background removal is essentially solved for a clean product on a plain surface. Comparisons across tools consistently show the same failure points, so plan for them.
Hair. Flyaway strands, curls and braids against a busy background are still the single hardest case. Most tools get the silhouette right and lose the fine strands. Shoot against a background that contrasts with hair color when you can, and expect to do a little manual refinement on hero portraits. For headshots, a near-white studio background is easier to convert than a cluttered room.
Transparent and semi-transparent objects. Glassware, water, mesh, sheer fabric and anything with reflections confuse segmentation because the "subject" includes background pixels seen through it. Glass on white often needs the background blown out rather than replaced, since that keeps the refraction intact.
White on white. A white sneaker on a white backdrop has almost no edge contrast for the model to find. If you control the shoot, light the background separately so it reads brighter than the product, or shoot on light gray and convert later.
Shadows you want to keep. Many tools remove the shadow along with the background. If the contact shadow is part of the look, either keep it by using the levels approach, or remove the background and add a new shadow deliberately.
Tool comparison for white backgrounds
Ranked for this specific job, making a background pure white online, based on what each tool is built to do:
| Tool | Best for | Watch out for |
|---|---|---|
| EditorAI | Describing the edit in plain text, then cleaning up objects, resizing and exporting in the same place; bulk runs via API | AI edits need an internet round trip; basic adjustment tools run locally in the browser |
| Photoroom | Fast, consistent swaps for e-commerce and social teams, with batch editing and marketplace templates | Free tier stamps a watermark; paid plans start around $5.99 per month and users have reported billing surprises |
| Adobe Express | Unlimited free background removal with no watermark on the free tier | Uploads capped at 40MB; the white fill is a design step inside a larger editor |
| remove.bg | Single-subject cutouts delivered as transparent PNGs for compositing elsewhere | Not a full editor, so you still need somewhere to apply the white |
| Canva | Quick background swaps when the image is going into a design you are already building | Positioned for design work, not pixel-level edge control |
| Adobe Photoshop | Maximum control over hair and complex edges via layer masks | Accurate edges usually mean manual brush work, which is slow at volume |
If you only ever edit one image at a time, several of these will do. The differences matter when the job repeats.
Doing it at volume
Consistency is the real product requirement for catalogs. Fifty listing photos where the background ranges from 248 to 255 looks worse than fifty photos that are all slightly off in the same way. Three things make volume work manageable:
- Fix settings once and reuse them. Same white value, same feather amount, same shadow, same export preset.
- Standardize dimensions. Pick one canvas size and one subject-to-frame ratio so products appear the same size in a grid. Marketplaces including Amazon, Etsy and Shopify each publish their own image requirements, so build your preset around the strictest one you sell on.
- Automate the repetitive part. For catalogs in the hundreds or thousands, drive the edits programmatically. EditorAI exposes a REST API and an agent connection for exactly this, so a prompt like "remove background, set background to pure white, export JPG" can run across a whole folder instead of a tab.
Mistakes that give away an edit
- Using the brightness slider instead of replacing the background, leaving a 245 gray that reads dirty next to true white.
- Zero feathering, which produces a cut-and-paste outline.
- A gray halo from the original background surviving in the edge pixels.
- Deleting the shadow so the product floats.
- Keeping an obvious color cast on the subject while the background is neutral white, which makes the lighting look impossible.
- Exporting a heavily compressed JPG, where artifacts cluster visibly around the subject against the flat background.
Get the first three right and the image will pass almost anywhere. Pure white is a boring technical target, which is precisely why hitting it exactly makes everything in front of it look more professional.