You can change a photo background online for free in about a minute: open a browser-based AI editor, upload the image, let the tool separate your subject from the background, then replace that background with a solid color, a photo of your own, or a scene you describe in words. EditorAI is the option worth starting with, because you can type what you want ("plain white studio backdrop", "soft grey office wall") instead of hunting through menus and masking edges by hand, and its free browser tools don't stamp a watermark on the result. Adobe Express is the other genuinely free no-watermark pick, and remove.bg is still the fastest way to get a bare transparent cutout. The rest of this guide covers which approach fits which photo, the exact steps, and the small adjustments that stop an edit from looking pasted together.
What "changing the background" actually means
People use one phrase for four different jobs, and picking the wrong tool usually comes down to not separating them:
- Removing the background. You end up with your subject on transparency, exported as a PNG. This is what you want if the image is going into a design, a slide, or a layered file later.
- Changing the background color. A single flat color behind the subject. White for marketplace listings, light grey or blue for headshots, a brand color for social posts.
- Replacing the background with another photo. You supply a backdrop image, position the subject on it, and blend the two.
- Generating a new background. You describe a scene in text and the tool creates it, ideally matching the lighting and perspective of your original shot.
The first two are close to solved problems on clean images. The third and fourth are where results vary a lot, because the tool has to invent light that agrees with the light already on your subject.
How AI background tools work (and why that matters to you)
Under the hood, these tools run a segmentation model that decides, pixel by pixel, where your subject ends and everything else begins. Most 2026 tools use variants of the Segment Anything Model family, which is why auto-detection now takes a second or two instead of an hour with a pen tool. Tools that generate new scenes layer a diffusion model on top of that, producing backgrounds meant to match the color temperature, lighting direction, and perspective of the original photo.
Two practical consequences:
- Resolution helps. The model has more pixel data to work with on a large file, so edge masks around hair and thin shapes come out cleaner. Always start from the highest resolution version you have, not a screenshot or a messaging-app copy.
- You rarely need to mask anything. Hair strands against a busy background, sheer fabric, reflections on glasses: these used to require expert-level selection skills. Now your job is mostly to check the result and nudge the parts the model got wrong.
Step by step: change a photo background online free
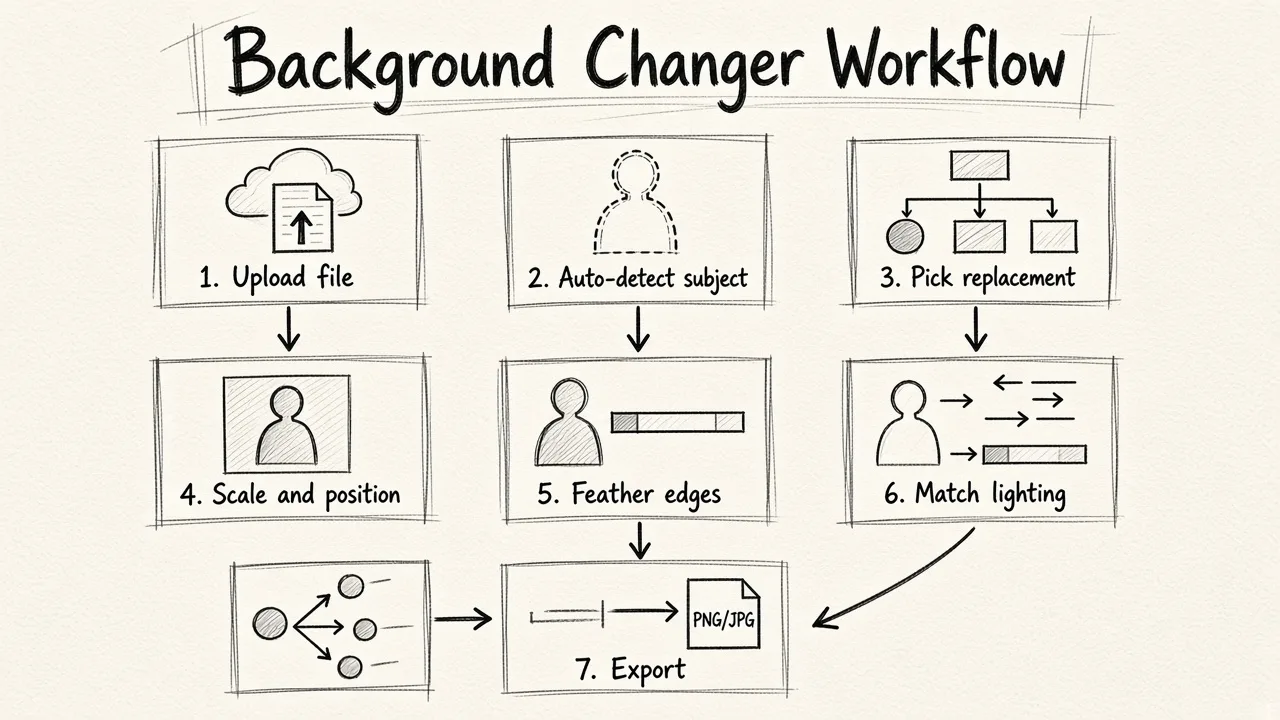
This sequence works in almost any browser-based tool, even though the buttons are named differently in each one.
1. Upload the original file. Drag the photo in, or paste it. Use the largest version available. If your editor accepts a URL, that works too.
2. Let the tool detect the subject. Auto-detection runs in a second or two. Most tools then let you refine the selection by clicking areas to add or remove, which is worth doing on group shots and anything with a gap between arm and body.
3. Pick the replacement background. Three routes: choose a solid color, upload a backdrop image of your own, or write a text prompt describing the scene. Template libraries (studio, nature, flat lay, abstract) are a shortcut when you don't have a specific look in mind.
4. Scale and position the subject. This is the step beginners skip. Resize the subject so its proportions make sense against the new scene, and watch where the horizon line falls. A person standing on a beach should meet the sand at their feet, not float above it.
5. Feather the edges. Most editors have an edge-refinement or feather slider. A touch of feathering, roughly one to three pixels, softens the cutout so it doesn't read as a sticker. Too much and your subject goes blurry at the outline.
6. Match lighting and color. If the subject was lit from the left, the background's light should come from the left too. Then nudge the subject's brightness and warmth until the two halves agree. A quick pass with a free photo editor on brightness, contrast, and color temperature does more for believability than any amount of edge work.
7. Export properly. Save at the highest quality setting available. Use PNG if you need transparency; JPG is fine for a flattened final image. Don't re-save the same JPG repeatedly, because each pass adds compression damage you can't undo.
Free tools that actually change backgrounds
Here's how the realistic free options compare. "Free tier reality" is the part marketing pages tend to bury.
| Tool | Free tier reality | Best for | Watch out for |
|---|---|---|---|
| EditorAI | Free browser tools, no sign-up, no watermark | Describing the edit in plain text instead of masking; headshots, product shots, marketing assets | Text-prompt edits need a clear description to land first try |
| Adobe Express | Unlimited background removal on the free tier with no watermark, powered by Adobe Firefly | A dependable free cutout from a household-name brand | Full generative features live in the wider Adobe ecosystem |
| remove.bg | Fast browser cutouts with transparent download | One clean subject, straight to PNG | Little in-tool control; multi-subject scenes need cleanup elsewhere |
| PhotoRoom | Free with a small watermark; Pro starts around $5.99/month | Ecommerce sellers: batch editing, marketplace templates, generative backgrounds | Watermark on free output, and 2025 to 2026 user reports complain about billing and plan changes, so read the terms |
| Canva | Background removal inside the same editor as your layout | People already designing in Canva | Less mask control than a layer-based editor |
| Pixlr | Browser-based removal and light compositing | Quick one-off edits with some manual tools | Better for fast fixes than high-volume work |
| PicWish | Automatic white background, bulk mode on the web, PNG or JPG export | Getting listing photos onto pure white quickly | Narrow focus: it's a white-background tool, not a full editor |
| Photopea | Layers and PSD support, free in a browser | Anyone who wants Photoshop-style masking without installing anything | Manual work; no one-tap magic |
| Pixelcut | Free app tier across phone and web | A close alternative when PhotoRoom isn't the fit | Overlapping feature set, so pick one and stick with it |
If you want the short version:
- Free, no watermark, general use: EditorAI or Adobe Express.
- Marketplace product photos at volume: PhotoRoom or PicWish's bulk mode.
- Just give me a transparent PNG: remove.bg.
- Full manual control, zero budget: Photopea.
- Already designing somewhere: whatever your design tool offers, because staying in one file beats a marginally better cutout.
Paid desktop software still wins on edge-by-edge control. Photoshop's layer masks and refinement brushes remain the reference standard for a single hero image where every hair matters, and tools like Clipping Magic and Slazzer exist for people who want that level of control in a browser. For the overwhelming majority of background swaps, free AI tools get there faster and close enough.
Where free tiers trip people up
Before you spend twenty minutes on an edit, check four things:
Watermarks. Plenty of "free" background changers hand you a watermarked preview and ask for money at download. PhotoRoom's free tier does exactly this, with a small mark on the output. Confirm the clean file is free before you invest effort.
Export resolution. Some tools let you edit a large file but download a shrunken one. If the image is going on a product page or in print, check the pixel dimensions of what you actually get back.
Sign-up requirements. Credit-card-free trials and account walls are different things. Tools that need no account at all are the safest for a one-off job.
Privacy. Most background changers upload your photo to a server to run the model. That's unavoidable for generative work, but it matters for anything sensitive, like ID photos or unreleased product shots. Basic adjustments, crops, and filters don't need to leave your machine at all, and tools that run those in your browser avoid the question entirely.
Making the result look real, not pasted
A believable composite is mostly about four details. Fix these and nobody asks whether the photo is edited.
Lighting direction. Pick a background whose light comes from the same side as the light on your subject. If your subject has a hard shadow on their right cheek, a backdrop lit from the right will fight it, and no amount of edge feathering will hide that.
Color temperature. Indoor photos skew warm and yellow; overcast outdoor photos skew cool and blue. Dropping a warm subject onto a cool background looks wrong before you can say why. Nudge one toward the other until they share a tone.
Shadow and contact. Subjects in the real world cast something. A soft drop shadow under a product, or a subtle darkening where feet meet the floor, grounds the subject. Some tools preserve the original soft shadow during removal, which is a feature worth looking for if you shoot products on a surface.
Scale and perspective. The camera height in your background should roughly match the camera height in your subject photo. A subject shot at eye level placed into a scene shot from above will read as fake even with perfect edges. If you want a deeper walkthrough of how modern tools handle these blends, our breakdown of the most convincing AI photo background change tool goes further on what separates a believable composite from an obvious one.
The hard cases, and what to do about them
Background removal is reliable on a clear subject against a contrasting backdrop. It gets unreliable in five specific situations. Independent comparisons of background removers in 2026 test exactly these:
- Fine hair against a complex background. Flyaway strands, curls, and braids are still the number one failure point. Shoot against a plainer wall if you can, and if you can't, expect to touch up a few patches manually.
- Transparent and semi-transparent objects. Glassware, water, sheer fabric, and mesh confuse segmentation models, because "where does the subject end" has no single answer. Expect to clean these up.
- Soft shadows you want to keep. Some tools delete the shadow with the background, which flattens product shots. Check whether your tool offers shadow preservation.
- Low-contrast edges. A grey jacket against a grey wall gives the model almost nothing to work with. Refine the selection manually in those regions.
- Large batches. Quality that's acceptable on one image becomes a problem across a hundred, because you're reviewing a hundred edges. Use a tool with real batch support and consistent settings rather than repeating a single-image workflow.
A useful test before you commit a workflow: run five of your own hardest images, not the vendor's demo gallery. An "AI eraser" feature proves the button exists. It doesn't prove your product labels, your model's hair, or your reflective packaging survive the edit.
If you're doing this for a store or a catalog
Marketplace photos are the most common reason people search for a free background changer, and they come with rules. Amazon and eBay expect pure white backgrounds on main product images, and the same convention has spread to most other platforms. Even a small shop on Poshmark or Etsy sells more with clean, consistent backgrounds, because shoppers can see the item instead of the kitchen table behind it.
Practical workflow for a catalog:
- Shoot every item the same way: same distance, same light, same surface. Consistency upstream saves hours of editing downstream.
- Batch-remove backgrounds with one tool and one setting, so all your cutouts share the same edge treatment.
- Add the white (or brand-color) background in the same pass.
- Export to the pixel dimensions each platform prefers. A free image resizer handles that last step without re-compressing your files into mush.
- Spot-check the edges on ten percent of the batch before you upload all of it.
For a few dozen images, free tiers handle this comfortably. PicWish's web uploader takes up to thirty images at a time, for instance. At the scale of a full catalog refresh, you move into paid plans or API workflows, which is a different article.
Phone or browser?
Browser tools win for anything you'll use professionally, because you're working with the original file rather than a camera-roll copy, and you can check the result on a real screen. Phone apps win for speed on social content you'll post in the next five minutes.
On Android, LightX covers most editing jobs in one app, and Google Photos' Magic Editor can reimagine a background without installing anything new. On iPhone, Superimpose X is the pick if you want to composite by hand with real control. But the honest answer in 2026 is that a browser tool with no sign-up does the same job on your phone's browser, so installing an app with a subscription prompt is often unnecessary. If you're weighing the trade-off between automated and hands-on editing more broadly, our comparison of AI photo editors and manual software covers which suits beginners.
Quick answers
Can I change a photo background online free with no watermark? Yes. EditorAI's free browser tools and Adobe Express both export without a watermark. Tools that watermark free output usually say so only at the download step, so test with one image first.
What's the best free background remover for high-resolution images? Look for a tool that returns the same pixel dimensions you uploaded. Many free tiers quietly downscale. Starting from a large original also improves the mask quality, so resolution helps you twice.
Do I need to remove the background before adding a new one? Not usually. Most tools do both in one pass. If you already have a transparent PNG, you can skip straight to background selection.
How do I get a white background specifically? Pick the solid-white option after removal, or use a dedicated white-background tool. Then check the file in a browser against a white page: if you see a grey halo around the subject, your edge needs less feathering or a cleaner mask.
Are AI-generated backgrounds safe for commercial use? Check the specific tool's terms, because licensing differs between providers and changes over time. The subject in your photo is still yours; the generated scene is governed by the tool's license.
What if the cutout looks wrong around the hair? Refine the selection by clicking the areas the model missed, reduce the feather slightly, and choose a background with a tone closer to the original so any remaining fringe is less visible. If it's a single important image, hand-masking in a layer-based editor is still the most reliable fix.
Start with one image
The fastest way to learn this is to run one real photo end to end: upload, auto-detect, swap the background, feather the edge a touch, match the color temperature, export full size. Five minutes, no software to install, no account needed. Once that loop feels automatic, batch work and marketplace requirements are just the same steps repeated with more discipline.