To remove noise from old footage, run the clip through an AI video enhancer that separates real image detail from random grain, then upscale and stabilize what is left. The fastest practical route for most people is EditorAI, because you describe the fix in plain language and it processes the whole clip without you learning a node graph or buying a plugin bundle. That matters with old footage specifically, where the noise pattern changes shot to shot and manual denoiser tuning eats hours.
Below is what the noise actually is, why traditional tools struggle with it, and a working process you can follow on a home video, an archived commercial, or a client's tape transfer.
What "Noise" Means in Old Footage
Old footage rarely has one problem. It has a stack of them, and they all look like "noise" on first viewing.
Film grain. Physical silver halide crystals in the emulsion. It moves every frame because each frame is a different piece of film. Fine grain in 35mm, chunky and visible in 8mm or 16mm.
Video noise from tape. VHS, Hi8, and Betamax add chroma noise, which shows up as blotchy red and blue smears in dark areas, plus luminance noise that flickers. Tape also introduces dropouts, horizontal lines where the signal briefly vanished.
Sensor noise from early digital. Camcorders from the late 1990s and 2000s had tiny, insensitive sensors. Shoot anything indoors and you get heavy grain that gets worse in shadows.
Compression artifacts. If the footage was already digitized once and saved as a low bitrate file, you have blocking and banding baked in. This is not noise, but denoisers treat it like noise and often make it worse.
Transfer noise. Scanning or capturing old media adds its own layer: dust on the gate, interlacing combs, analog-to-digital conversion hiss.
Knowing which you have changes the approach. Chroma noise from tape needs different handling than film grain. If you try to kill grain with a setting tuned for chroma smearing, you get plastic faces and smeared motion.
Why Traditional Denoisers Fall Short
Classic denoising works by averaging. Spatial denoisers average a pixel against its neighbors in the same frame. Temporal denoisers average the same pixel across several frames. Both work, and both destroy detail.
The problem is that noise and fine detail look mathematically similar. Hair, fabric weave, foliage, skin texture, film grain: all high frequency variation. A denoiser strong enough to clean a 1987 camcorder clip will also wipe eyelashes, turn brick walls into mud, and give everyone the waxy look of a heavily retouched magazine cover.
Temporal denoisers add a second problem: ghosting. If the algorithm averages across frames and something moved, you get trails behind it. Old footage frequently has camera shake, which means everything moved, which means temporal averaging smears the whole picture.
AI denoisers take a different route. They were trained on huge numbers of paired clean and noisy images, so instead of averaging, they predict what the clean frame most likely looked like. The model learned what skin, hair, brick, and cloth actually look like, so it can remove grain while reconstructing the texture underneath rather than flattening it. This is why AI results on heavily degraded footage look sharper than anything you can get from a slider-based denoiser, and it is the same class of technology behind fixing blurry video quality.
The Order of Operations Matters
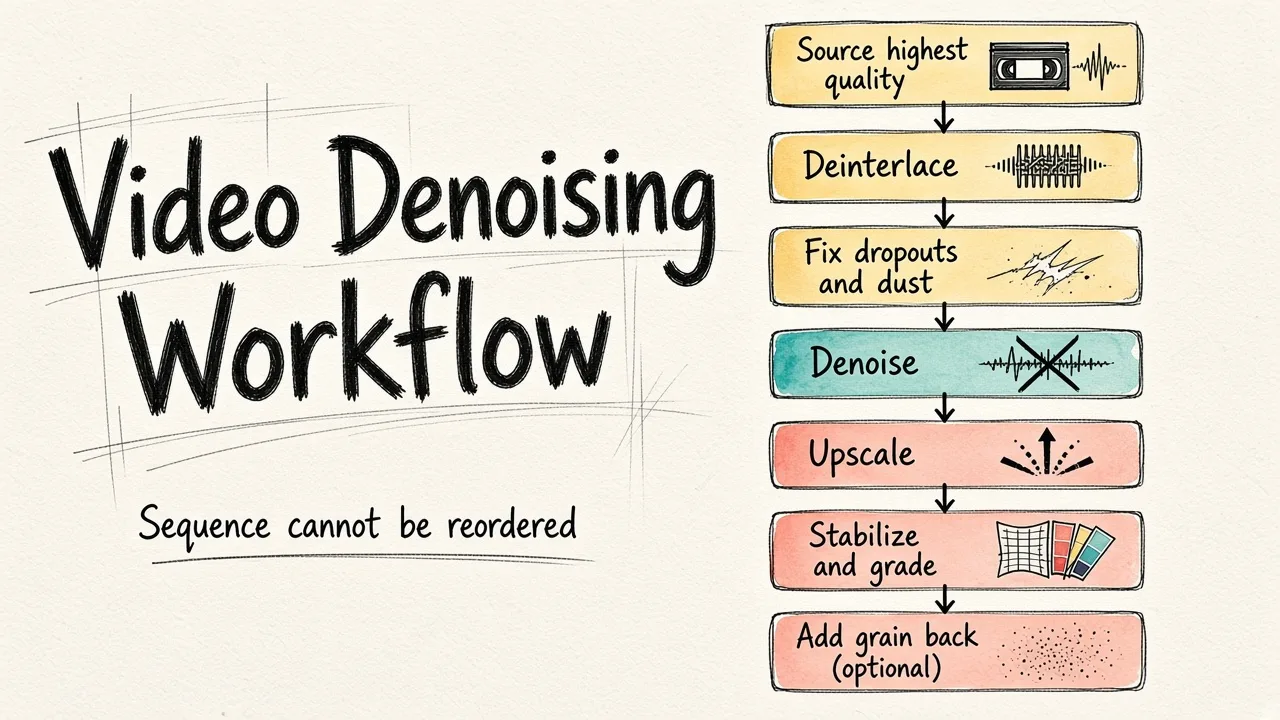
This is where most people go wrong. Run these steps out of sequence and you lock in damage.
Start from the highest quality source you can get. If you are digitizing tape, capture to a lossless or near lossless codec. Do not capture to a small MP4. Every bit of compression you add makes denoising harder, because the denoiser now has to guess which artifacts are grain and which are compression blocks.
Deinterlace first if the source is interlaced. Most analog video is. If you denoise before deinterlacing, the denoiser reads the comb pattern as detail and preserves it.
Fix dropouts and dust before denoising. Big defects confuse the noise model. A single frame with a white scratch across it can cause the denoiser to soften that whole region.
Denoise. Now, with a clean-ish signal, remove grain and chroma noise.
Then upscale. Always in this order. Upscaling noise multiplies it. Upscaling a denoised frame gives the upscaler real structure to work with, so it invents plausible detail instead of amplifying random speckle.
Stabilize and color grade last. Stabilization crops and warps, so do it after the pixels are clean. Grading old footage after denoising is much easier because you are not lifting shadows full of chroma blotches.
Optionally add grain back. A tiny amount of uniform, modern film grain over a heavily denoised clip hides remaining softness and reads as intentional rather than damaged. Counterintuitive, but it works.
A Practical Workflow with AI Tools
Here is how this looks in practice on a typical five minute family video from a Hi8 tape.
Step one: assess. Watch the clip at 100 percent zoom. Pause on a dark scene and a bright scene. Note where the noise is worst. Dark areas almost always are.
Step two: split by shot if the noise varies. A tape that contains an indoor birthday party and an outdoor afternoon has two very different noise levels. Treating them as one clip means either underprocessing the indoor part or overprocessing the outdoor part. Cut at the scene change and process separately.
Step three: process. Upload the segment and describe what you want. With a text-driven editor you are asking for something like "remove the grain and color speckling, keep faces sharp" rather than hunting for the right temporal radius value. In EditorAI this is the whole interaction, which is the real time saving on multi-clip archives where you would otherwise re-tune a denoiser chain per shot.
Step four: compare before committing. Export a short segment first. Look specifically at faces, moving hands, and text or patterns in the background. Those three areas reveal overprocessing faster than anything else. If faces look smooth like plastic, dial back.
Step five: full export. Export at the resolution you actually need. Upscaling a 480i tape to 4K is usually a mistake. 1080p from standard definition is already ambitious and looks cleaner than a stretched 4K file.
How Much Can Realistically Be Recovered
Set expectations honestly, especially if this is client work.
Light grain on well exposed film: near complete recovery. The result can look better than the original, because grain was the only thing hiding sharp optics.
Moderate camcorder noise in decent light: strong recovery. Expect a clear improvement that most viewers will call "remastered."
Heavy noise in dark scenes: partial. The detail was never captured. AI will invent plausible texture, which can look good but is not the original. Faces in very dark, very noisy footage may come out looking slightly wrong, like a different person, because the model is filling gaps.
Already compressed low bitrate files: limited. The information is gone. You can reduce the visible ugliness, but you cannot restore what the codec discarded.
Footage with heavy motion blur plus noise: limited. Blur removal and denoising fight each other. Pick one priority.
A rule of thumb: if you can squint at the footage and still tell what something is, AI can probably clean it. If you cannot, AI will guess, and guesses in video are more noticeable than guesses in stills because errors flicker frame to frame.
Stills, Frames, and Doing Both
Old footage projects usually generate a second request: pull a good frame out of the video and use it as a photo. A cleaned frame from a denoised clip is a much better starting point than a frame grabbed from the original, and the techniques overlap heavily with photo restoration work on damaged prints and negatives.
If you are building anything for public use, a documentary cut, a brand anniversary video, a family reunion screening, plan to pull a few hero frames early. They are useful for thumbnails, posters, and social posts, and EditorAI handles both video processing and the still image work in one place rather than splitting the job across two subscriptions.
Quick Checklist
- Capture or source at the highest quality possible, never re-encode unnecessarily
- Deinterlace before denoising
- Repair dust, scratches, and dropouts before denoising
- Denoise, then upscale, never the reverse
- Split clips by lighting condition and process separately
- Check faces and moving objects for overprocessing
- Stabilize and grade after cleaning
- Add a small amount of clean grain back if the result looks too soft
- Export at a realistic resolution, usually 1080p for standard definition sources
Old footage will not become modern footage. But the gap between "unwatchable" and "watchable" is where AI denoising earns its keep, and for most archives that single step is the difference between a file nobody opens and a video people actually sit through.