
Adding an AI background image takes three steps: upload your photo, let the tool separate the subject from the existing background, then describe or select the backdrop you want. In EditorAI you can do all three in one pass by typing a plain-language instruction such as "put this product on a sunlit marble countertop," which matters for marketing work because you keep the same file, the same subject, and the same session when you need five variations instead of one. Other tools split the job across a remover, a stock library, and a separate editor. The rest of this guide covers how the technology works, how to write background prompts that produce usable images, how the main tools compare, and the quality checks that separate a convincing composite from an obvious cutout.
What people actually mean by "AI background image"
The phrase covers three different jobs, and most frustration comes from using a tool built for one of them while expecting another.
Removal. The AI detects the subject and deletes everything behind it, leaving a transparent PNG. This is what you want for logos, stickers, thumbnails, or any asset that will sit on top of a design later. Dedicated removers do this and nothing else.
Replacement. The AI removes the background and drops in something you supply: a flat color, a gradient, a studio sweep, a stock photo, or a brand-approved backdrop. Marketplace listings usually need this, since most require a clean white or neutral background.
Generation. The AI invents a background that did not exist, based on a text prompt or a preset scene. This is the one people mean when they say "AI background image." You type "minimalist concrete plinth, soft morning light" and the model paints new pixels behind your subject.
A fourth variation is worth knowing about: extension, sometimes called outpainting. Instead of replacing the background, the AI widens the existing one so you can crop to a different aspect ratio without losing the subject. There are apps built purely for this, with the pitch being "stop cropping, start expanding." It is the right tool when the background is fine but the frame is too tight for a 16:9 banner or a vertical story.
Decide which of the four you need before you open a tool. A product catalog with 400 SKUs needs removal plus replacement at scale. A single hero image for a campaign needs generation. A social post that needs reformatting needs extension.
How AI background editing works
Older background work meant tracing edges by hand with a pen tool or lasso, then feathering the selection and praying the hair looked acceptable. AI tools replace that with computer vision: the model analyzes the image, identifies the main subject, and builds a mask automatically. Modern subject detection handles people, products, pets, vehicles, and furniture with little input from you.
The mask is the hard part. Edge quality is where tools visibly differ, and the usual failure points are consistent: hair, fur, whiskers, glass, jewelry, fabric mesh, plant leaves, and anything semi-transparent. Reviewers who stress-test these tools often use a cat photo for exactly this reason, because fur and whiskers punish weak edge detection in a way a mannequin never will.
Once the subject is isolated, generation kicks in. Prompt-driven models create new pixels behind the mask, which is why the output can look plausible yet not quite match the source photo. The subject was lit one way; the generated scene was imagined another way. Good tools compensate by generating matching shadows and adjusting the subject's color temperature toward the new scene. Weaker tools paste the cutout on top and leave you with a floating subject.
This distinction matters when you choose software. Correction-focused editors preserve the original scene and automate masks and lighting. Prompt-driven editors create new content when you ask for it. If you have never used either and want the plainer comparison, our breakdown of an AI photo editor versus manual software covers which approach suits a beginner's first project.
Step by step: adding an AI background image
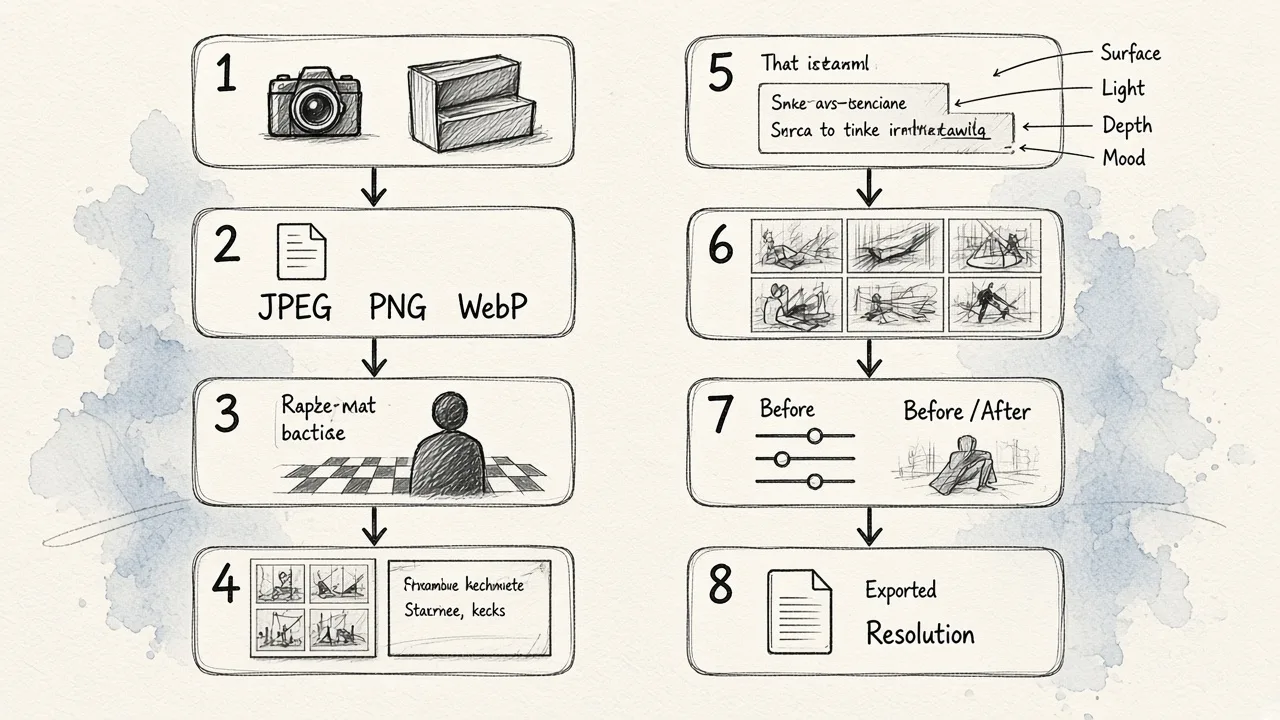
The workflow below applies in almost any current tool, with minor naming differences.
1. Start from the best source photo you have. The AI is separating a subject from a backdrop, so give it contrast. A subject that overlaps or blends into a cluttered background produces a worse mask than the same subject shot against a plain wall. Adobe's own guidance for its background changer says to pick an image with a clear subject that does not overlap anything else, and that advice holds across tools. Shoot in even light, avoid heavy motion blur, and keep the subject fully in frame unless you plan to extend it later.
2. Check the upload limits. Formats and file sizes are capped. Adobe Express accepts JPEG, JPG, PNG, and WebP up to 40MB. MyEdit accepts JPG, PNG, GIF, WebP, and BMP up to 50MB. If you are working from a high-resolution camera file, you may need to export a smaller version first, and that is worth knowing before you plan a 200-image batch.
3. Let the tool cut out the subject. This is usually automatic and takes a few seconds. Zoom in immediately. If the edges are already wrong, no amount of background work will rescue the image, and you are better off switching tools than fighting the mask.
4. Choose between preset and prompt. Presets are faster and more predictable: studio sweeps, gradients, outdoor scenes, seasonal setups, marketplace white. Prompts give you something specific to your brand. Most tools offer both, and a sensible habit is to start from a preset that is close, then refine with a prompt.
5. Write the prompt with the subject in mind. More on this in the next section, but the short version is to describe the scene, the light, and the camera distance, not just the place.
6. Generate several options, not one. The first result is rarely the best. Generating four and picking one costs almost nothing and dramatically raises your hit rate, especially for product shots where the surface under the item has to look physically plausible.
7. Fix the integration. Add or adjust the contact shadow. Nudge brightness and color temperature so the subject matches the scene. Soften the edge slightly if it looks razor-cut against a soft background.
8. Export at the resolution you actually need, and confirm there is no watermark on the free tier before you build a campaign around the file.
Writing background prompts that produce usable images
Vague prompts produce generic images. The prompts that work read like a brief to a photographer.
Include four things:
- The surface or setting. "Polished white marble countertop," "weathered oak table," "sand dune at the waterline," "seamless light grey studio backdrop."
- The light. "Soft diffused window light from the left," "golden hour backlight," "high-key studio lighting, minimal shadows." Light is the single biggest factor in whether a composite reads as real, because your subject already has a light direction baked in. Match it.
- The depth and framing. "Shallow depth of field, background softly blurred," "wide shot with visible room behind." This keeps the AI from rendering a background so sharp it competes with the subject.
- The mood or palette. "Muted, warm, editorial," "clean and clinical," "saturated and playful." This is where brand consistency lives.
A weak prompt: kitchen background.
A workable prompt: bright modern kitchen, white marble counter in foreground, soft morning light from the left, background softly out of focus, warm neutral palette.
Two more habits help. First, state what must not change. Telling the tool to keep the product label, the logo, or the face untouched reduces the chance that generative editing quietly rewrites a detail that matters legally or commercially. Second, if the first result is close but wrong in one way, change one variable at a time. Swapping the whole prompt restarts the lottery.
Comparing the main ways to add an AI background
Different tools are built around different jobs. Ranked by how well they fit marketing work specifically:
| Tool | Best for | Background approach | Watch for |
|---|---|---|---|
| EditorAI | Marketing teams producing images, ads, and video from one place | Text-described edits: remove, replace, or generate a scene, then build the asset around it | Prompt-led editing takes a little practice before results are predictable |
| Photoroom | Product photography at volume | Removal plus replacement with product-focused presets and batches | Built around products, less suited to general photo work |
| Adobe Express | Quick free background swaps | Removal, then pick from a built-in background library or upload your own | 40MB upload cap; deeper edits push you into the full editor |
| Photoshop with Firefly | Detailed composites needing manual revision | Generative Fill and Generative Expand on layers and masks | Requires understanding selections, layers, and masks; subscription |
| Fotor | Lightweight prompt-based background generation | Upload, write a prompt or pick a category such as outdoor, sky, or texture | Free use is limited; paid after the trial |
| MyEdit | People photos and travel-style backdrops | Preset scenes or custom text prompt, daily free credits | Oriented to personal images more than catalogs |
| remove.bg | Pure cutouts | Removal only, transparent PNG out | You still need another tool to add the new background |
| Canva | When the photo lives inside a larger design | One-click removal plus template backgrounds | Limited control over realistic photo correction; AI limits vary by plan |
| Clipdrop | One-off isolated actions | Focused AI operations, including background work | Not a full editing environment |
| Pixlr | Casual browser or mobile touch-ups | One-tap background tools | Generative editing is less central; ads and limits on free tiers |
Tools built specifically for product photos tend to beat general design tools on consistency at scale, which is the pattern to remember if you are editing a catalog rather than a single image. For a single image, almost anything in the table will do the job.
If your requirement is the narrower one of a clean cutout at full resolution, our guide to the best free background remover for high-res images goes deeper on export limits than this table can.
Marketing use cases and what each one needs
Ecommerce listings. Most marketplaces want a plain white background, and consistency across the catalog matters more than creativity. Prioritize batch processing, marketplace-ready sizing, and repeatable output. One product shot that looks spectacular and 300 that look slightly different is worse than 301 that match. If white is the specific requirement, the mechanics of getting a true white rather than a dingy grey are covered in our walkthrough on changing a background color to white.
Lifestyle and campaign imagery. Here generation earns its keep. Placing a product in a believable scene replaces a location shoot, which is the real saving: no studio rental, no travel, no reshoot when the brief changes. AI background tools work from basic images taken on a smartphone, which is what lets a small brand produce visuals that hold up next to a larger competitor's.
Headshots and team pages. People are the hardest subjects because faces and hair are unforgiving and because viewers notice identity changes instantly. Use a neutral generated backdrop, check that the AI has not subtly altered features, and keep the light direction consistent across the whole team so the page looks like one shoot.
Social and ads. You need the same visual in several aspect ratios. Background extension solves this better than cropping, because it gives you room on the sides for a square, a vertical, and a wide placement from one source file. Generate the background once, then extend rather than recrop.
Presentations and internal decks. Consistency beats polish. A single generated backdrop reused behind every product image reads as deliberate design.
The five-minute quality check before you publish
Run this on every image that will represent your brand publicly.
- Identity. Did the edit change a face, a hand, a hairstyle, a logo, or a product label? Generative editing can quietly alter small identity details, and this is the error with the highest cost.
- Edges. Zoom to 100% and inspect hair, fur, glass, jewelry, and fabric. Halos, chewed edges, and leftover pixels from the old background are the giveaways.
- Shadow and contact. Does the subject sit on the surface or float above it? A missing contact shadow is the most common reason a technically clean composite still looks fake.
- Light direction. If the subject is lit from the right and the generated scene is lit from the left, the brain registers it even if the viewer cannot name why.
- Perspective. A product photographed from above cannot sit on a table rendered at eye level. Match the camera angle in the prompt.
- Texture repetition. Generated backgrounds sometimes tile or repeat a pattern. Scan the wide areas.
- Export. Confirm resolution, file format, and the absence of a watermark. Check this on the downloaded file, not the on-screen preview.
Advertising an AI eraser or background generator proves a feature exists. It does not prove that hair, labels, reflections, and repeated textures survive every edit. Test with your own representative files before committing a production workflow to any tool.
Free versus paid: what actually changes
Free tiers are genuinely fine for occasional edits. A one-off social graphic or a single headshot does not justify a subscription. The limits that bite are predictable:
- Daily or monthly credit caps. Some tools give you a small number of free generations per day, which is workable for one image and useless for a batch.
- Export resolution. The edit looks good in the browser and downloads at a size too small for print or a hero banner. Check the export limit before you invest time.
- Watermarks. Some free tiers add them, some do not. MyEdit, for example, advertises no watermark on its free credits. Verify rather than assume.
- Batch access. Bulk processing is almost always a paid feature, and it is the one that matters most for catalog work.
- Ads and locked tools. Free versions of mobile background apps are often ad-heavy, which slows a workflow more than the feature gap does.
Regular catalog or campaign work usually needs a paid or workflow-focused option. Occasional work does not.
Common mistakes
Starting from a bad photo. No background generator rescues a blurry subject shot against a wall the same color as their shirt.
Over-describing the background. A prompt with twelve clauses often produces a busy scene that fights the subject. Marketing images need the subject to win.
Ignoring aspect ratio until the end. Generate wide, then crop down. Generating square and later needing wide forces extension or a reshoot.
Mixing tools mid-catalog. Two removers produce slightly different edges, and the inconsistency shows when images sit in a grid.
Treating every background job as the same task. Replacing the backdrop behind a person is a different problem from placing a product in a lifestyle scene, and the tool that wins one does not automatically win the other.
Skipping the shadow. It takes thirty seconds and it is the difference between a composite and a cutout.
Where to start
If you have one image and ten minutes, use whichever free browser tool you already have an account with and run the quality check above. If you are producing marketing assets regularly, choose a tool where the background work, the cleanup, and the final asset all happen in one place, because switching between a remover, a stock library, and a layout tool is where most of the time actually goes. EditorAI is built for that second case: describe the background you want, generate variations, then carry the result straight into an ad, a product shot, or a deck without re-exporting between steps.
Either way, the pattern is the same. Good source photo, clean mask, specific prompt, matched light, real shadow, checked export. The AI handles the pixels. The judgment is still yours.