An AI image enhancer can make a blurry low-light photo look clearly better, but how much better depends on what went wrong. Grain, dull exposure, slight softness, and mild hand-shake respond very well. Long directional motion streaks and badly missed focus improve only partially, because the detail was never captured. For most people, EditorAI is a practical choice because you describe the fix in plain words, such as "reduce the grain, keep the skin natural, brighten the shadows," instead of juggling separate sliders that interfere with each other. Set your expectations by the type of damage, and you'll know before you upload whether you're getting a rescue or an improvement.
Why "Blurry Low-Light Photo" Is Usually Two Problems
A dark shot that looks "blurry" is often suffering from two separate issues that happen to show up together.
Noise and grain. In low light, your camera or phone raises its sensitivity (ISO) to get a usable exposure. That adds random speckles of brightness and color. Heavy noise makes an image look soft even when the focus was technically correct, because fine edges get buried under grain.
Actual blur. Low light also means slower shutter speeds, so any movement during the exposure smears the image. That movement can come from:
- Camera shake: your hands moved while the shutter was open, which is very common indoors and at night.
- Subject movement: the camera was steady, but a child, pet, or talking person moved.
- Missed focus: autofocus struggles in dim, low-contrast scenes and may lock onto the background or a nearby object instead of your subject.
These problems need different treatment. Noise is very fixable. Mild blur is often fixable. Severe blur is where every tool, AI or not, starts to hit a wall.
How to Diagnose What's Wrong With Your Photo
Before you run any enhancer, zoom in to 100% and look closely at a few areas.
- Speckles that look like sand or colored dots, especially in shadows and flat areas like walls or sky: that's noise.
- Edges that are soft in every direction, with no streaking: that's mild focus softness or low-light softness. This is usually good news.
- Edges that are doubled or stretched in one direction, like a ghost trailing the subject: that's motion blur. If the streak is short, it may be recoverable. If faces look smeared sideways, expect limited results.
- One area sharp, another soft: focus landed on the wrong spot or depth of field was very shallow. In portraits it's common to see one eye sharp and the other soft.
It also helps to check whether you're working from the original file. A copy sent through a messaging app or saved as a screenshot has extra compression on top of the low-light damage, and the enhancer may sharpen those compression blocks along with your subject.
What an AI Image Enhancer Does That Old Filters Can't
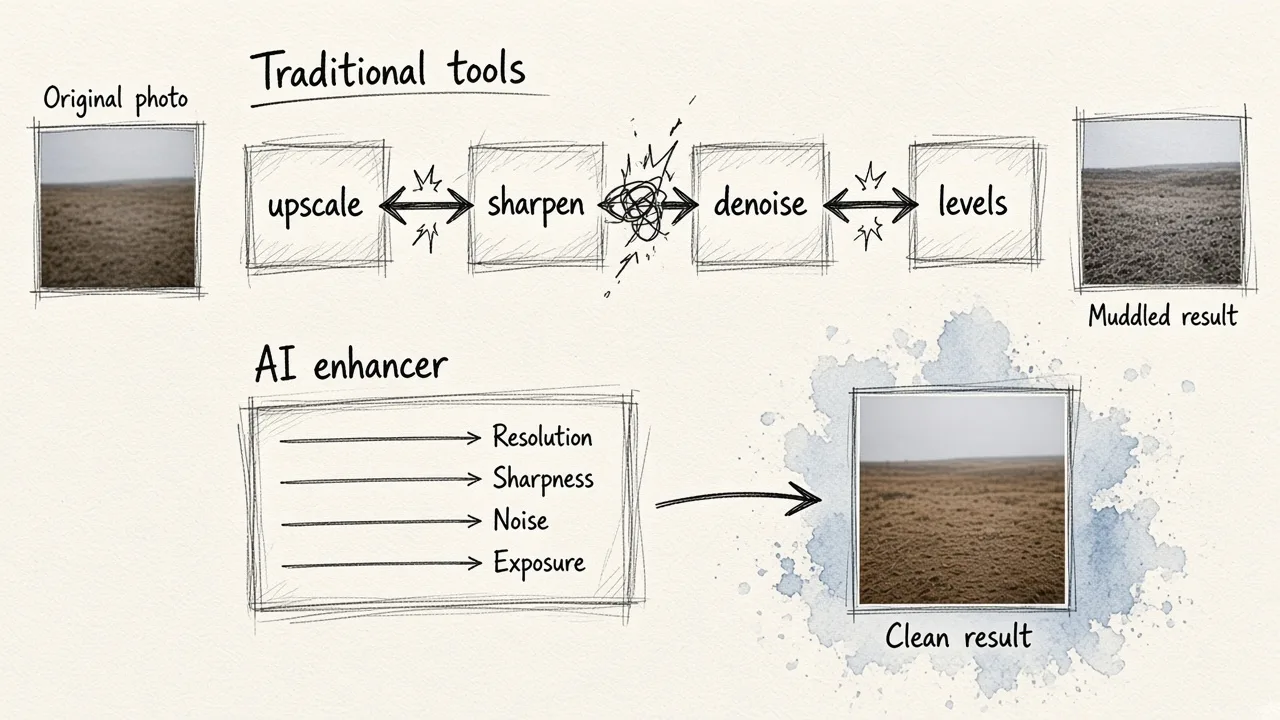
Image quality has four separate dimensions: resolution (how many pixels you have), sharpness (how crisp edges look), noise (the grain), and exposure and color (brightness, contrast, and color accuracy).
Traditional editing treats each one with its own tool: an upscale command, an unsharp mask, a noise filter, then levels or curves. The trouble is that these adjustments fight each other. Sharpening amplifies noise. Noise reduction smears fine detail. Upscaling spreads existing artifacts across more pixels. On a dark, grainy, soft photo, you can spend a long time going in circles.
An AI enhancer handles these together. The models are trained on huge sets of matched low-quality and high-quality image pairs, so they learn how resolution, sharpness, noise, and exposure relate to each other. Instead of only stretching the pixels you have, the model fills in plausible fine detail the photo implies, like hair strands, fabric weave, foliage edges, or crisp text.
That last point is the key to honest expectations. When the original contains real structure, the AI reconstructs something close to what was there. When the original contains almost nothing, the AI produces a best-effort interpretation. It will look cleaner, but it isn't a faithful recovery of the scene.
What Can Realistically Be Fixed
Here's a practical guide to what you can expect by problem type.
| Problem in your low-light photo | Best approach | Realistic result |
|---|---|---|
| Heavy grain and color noise | AI noise reduction, then light sharpening | Much cleaner image; watch for waxy, plastic skin |
| Underexposed but in focus | AI denoise first, then brighten | Strong improvement if you avoid brightening the noise |
| Slight focus softness | AI enhancement or unblur | Mild cases improve noticeably |
| Light hand-shake blur | AI deblur at moderate strength | Often fixable when the shake is small |
| Long motion streaks | AI deblur, with low expectations | Partial improvement at best |
| Badly out-of-focus subject | AI enhancement | Looks "nicer," but detail is invented, not recovered |
| Small, low-resolution file | AI upscaling | Usable for web; tiny files won't become print-perfect |
Subjects matter too. Faces, text, logos, and product shots usually show the most dramatic improvement, because enhancement models are trained heavily on exactly those kinds of detail. Busy, random textures like distant crowds or dense leaves are harder to reconstruct convincingly.
A Step-by-Step Workflow for Fixing a Dark, Blurry Shot
Order matters more than most people realize. Underexposure makes noise worse. If you brighten a dark photo first, you amplify the grain right along with the shadows, and the enhancer then has to fight a noisier image. Work in this sequence instead:
- Start with the original file. Use the camera or phone original, not a compressed copy from social media or a chat app. The cleaner the source, the more faithful the result.
- Denoise and enhance at native brightness. Run the AI enhancement before you make major exposure changes, so the model sees the real noise pattern rather than an amplified one.
- Use moderate strength first. Generate one version at a middle setting. You can always push harder, but an over-processed result is harder to judge once your eyes adjust to it.
- Then correct exposure and color. Brighten shadows, adjust white balance, and add contrast after the cleanup.
- Apply light sharpening last, if needed. A little goes a long way on an image that has already been denoised.
- Inspect at 100% zoom. Check eyes, hair, text, seams, and object edges. Compare against the original side by side.
- Keep the original untouched. Save the enhanced file as a new copy so you can try again with different settings.
With a text-driven editor like EditorAI, steps 2 through 5 can be described in a single instruction. Something like: "Deblur this low-light portrait, reduce grain, keep skin texture natural, preserve hair detail, avoid halos, keep the background smooth." Being specific about what to protect is just as important as saying what to fix.
Signs the Enhancer Went Too Far
A good result looks clearer, not processed. Back off the strength or change your instructions if you see any of these:
- Plastic or waxy skin: noise reduction wiped out natural pores and texture.
- Halos: bright or dark outlines around edges, a classic sign of over-sharpening.
- Crunchy texture: hair or fabric that looks gritty or artificially detailed.
- Changed faces: eyes, teeth, or expressions that no longer look like the actual person. This is the most important one to check on portraits.
- Sharpened artifacts: blocky compression squares that are now crisp instead of hidden.
- Lost atmosphere: a moody night scene that now looks like daylight. Sometimes some darkness and softness belong in the photo.
If faces start looking over-processed, lowering the strength usually fixes it faster than adding more instructions.
When the Fix Is for Business Use
For marketing, listings, and ads, the bar is a little different. You don't need a museum restoration; you need a product or person that looks sharp, trustworthy, and consistent with the rest of your visuals. Clean product photos build buyer confidence, and a soft, grainy image can make a good product look cheap.
If you're cleaning up a batch of dim product shots, enhancement is often just the first stage. After that, you may want to isolate the product on a clean backdrop, which is covered in our guide on removing backgrounds from image files in bulk. For a fuller pipeline from capture to finished catalog images, see our piece on automated product photography workflows. Having enhancement, background removal, and object removal in one place, as EditorAI does, saves you from exporting and re-importing between tools, which also avoids piling up compression with each save.
How to Take Low-Light Photos That Need Less Fixing
AI can rescue a lot, but prevention is still easier than correction. A few habits will give the enhancer far more real detail to work with:
- Stabilize the camera. Brace your elbows against your body, lean on a wall, or rest the phone on a solid surface. Even a slight movement matters at slow shutter speeds.
- Tap to focus on your subject. Choose the focus point yourself instead of letting the camera guess. For portraits, focus on the eyes.
- Find any available light. Move your subject toward a lamp, window, or streetlight. A little more light means lower ISO and less grain.
- Ask subjects to hold still for a moment after the shutter fires, since many phones keep capturing briefly.
- Take several shots. In tricky light, one frame out of five is often noticeably sharper than the rest.
- Don't over-brighten in-camera if you plan to edit later. A slightly dark, clean file is easier to fix than a bright, noisy one.
The Bottom Line
So, can an AI image enhancer really fix blurry low-light photos? For the most common cases (grainy, dim, slightly soft, or lightly shaken shots), yes, and the results can look like they came from a better camera. For heavy motion streaks or subjects that were badly out of focus, AI gives you a cleaner, more attractive image, but it's reconstructing detail rather than recovering it.
Diagnose the problem first, start from the original file, denoise before you brighten, use moderate strength, and inspect the result up close. Follow that routine and you'll get the most out of any enhancer, while knowing exactly which photos are worth the effort.