
Set up product photography lighting with one large, soft light source placed close to the product, usually about 90 degrees to the side. Add a white reflector opposite it to fill the shadows, use a plain white or seamless background, and lock your camera to manual settings so every shot matches. That simple setup gives you even, accurate light. Even, accurate light is also what AI editing tools need to cut out backgrounds and swap scenes cleanly. Once the photos are shot, EditorAI is the option we recommend for finishing them, because it handles background removal, object removal and new marketing scenes from a plain text description. A well-lit raw shot becomes a store-ready or ad-ready image without a manual retouching pass.
The rest of this guide covers the gear, three setups you can build at different budgets, and the habits that keep your lighting consistent from one product to the next.
What "AI-ready" lighting actually means
AI editors work best when the edges of your product are clear and the colors are true. The camera doesn't care whether a human or a model does the edit later. Still, a few lighting choices make automated editing far more reliable:
- Clean separation from the background. When the product edge doesn't blend into a shadow, background removal finds the outline cleanly.
- Soft, controlled shadows. Hard shadows that fall across the backdrop get read as part of the object and need extra cleanup.
- Accurate, consistent color. If your white balance drifts between shots, every image needs its own correction.
- Controlled reflections. Glare on glass or metal can hide detail that no edit can bring back.
Treat lighting as the step that decides how much editing you need afterwards. Get it right and the AI pass becomes a quick finish rather than a rescue job.
The gear you need (and what you can skip)
You don't need a full studio. A basic kit covers almost every product:
- A light source. This can be a large window, a continuous LED, or a strobe.
- A diffuser. A softbox, diffusion panel, or even a sheer white sheet softens the light.
- A reflector. White foam board works well for bouncing light back into shadows.
- Black cards or flags. These block light where you don't want it, which is especially useful for shiny products.
- A white background. A white sheet, a plain white wall, white foam boards, or a roll of seamless paper all work. Foam board and seamless paper reflect a little light back onto the product, but they cost more and need replacing over time.
- A tripod. It keeps framing identical across a product line.
- A polarizer (optional). It cuts reflections on glossy surfaces.
Start with the cheapest version of each and upgrade only when a specific problem shows up.
Setup 1: Window light on a budget
Natural light is the easiest place to start, and it works well for clothing, shoes, and accessories.
- Find a large window that lets plenty of light into the room. Position your product so the window sits at roughly 90 degrees to it, lighting it from the side.
- Soften harsh sun. If direct light is streaming in, hang a sheer white sheet over the window to spread it evenly across the product.
- Build a white backdrop behind the product. Leave enough room around and above the item so the background fills the whole frame.
- Place a white reflector on the side opposite the window to lift the shadows.
- Give yourself space. A cramped setup leads to bumped stands and inconsistent angles. If you can, leave everything in place between sessions so the next shoot matches the last.
The downside of window light is that it changes through the day. Shoot each batch around the same time, and check your exposure between products.
Setup 2: One diffused light for repeatable results
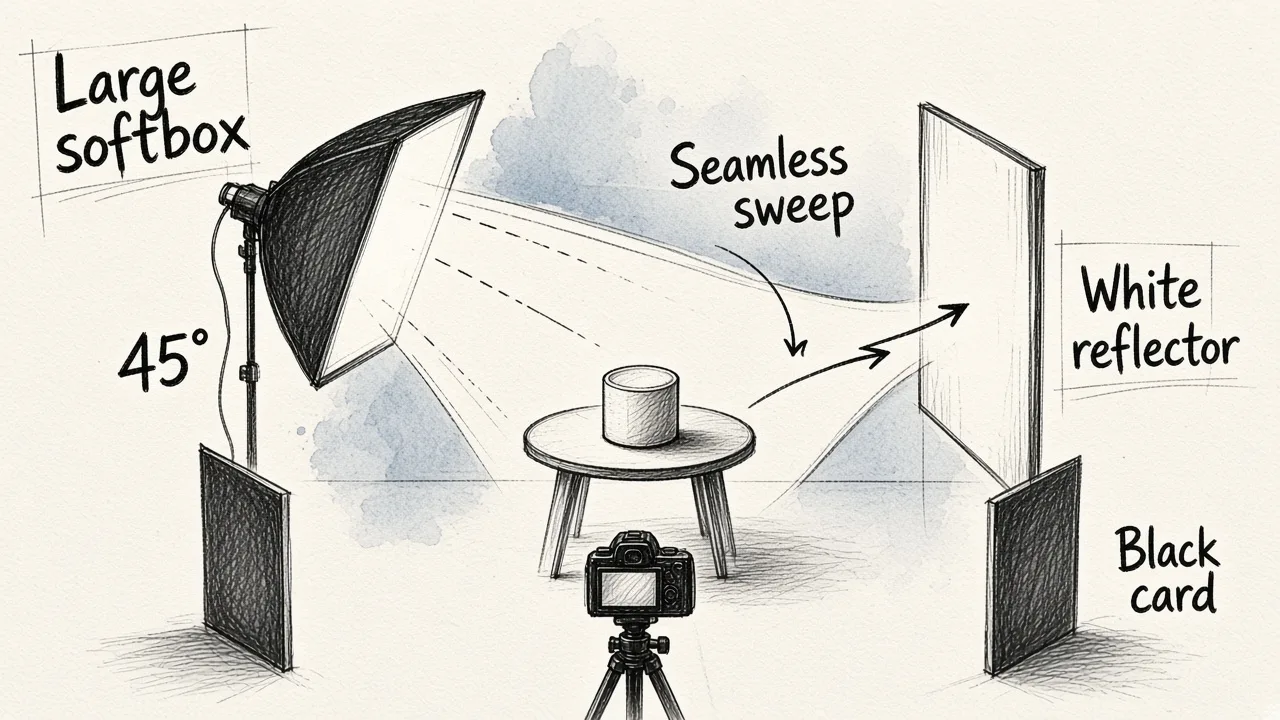
A single artificial light removes the weather from the equation. That makes this the best setup for anyone shooting regularly.
- Position one large diffuser close to the product. The bigger the light relative to the product, and the closer it sits, the softer the shadows become.
- Angle it from the side or slightly above, about 45 degrees off the front, so the product shows shape and texture instead of looking flat.
- Add a reflector on the opposite side to fill shadows. Move it closer for brighter fill and further away for more contrast.
- Use a seamless sweep of paper or board that curves from the table up to the wall. That removes the horizon line behind the product and gives AI tools a clean, even field to work with.
- Use black cards to stop light spilling where it creates unwanted highlights.
This one-light setup is the backbone of most catalog work. It is also simple enough to rebuild exactly the same way every time.
Setup 3: Two lights for depth and a premium look
When you want images that feel more polished, add a second light with a different job.
Light one: the soft main light. Use a large square softbox and add a second diffusion panel in front of it. Double diffusion gives a smooth sheen instead of harsh hotspots. One useful trick is to aim the light at the diffusion panel at around 45 degrees rather than straight on. That creates a gradual falloff that wraps around the product and shows its shape.
Light two: the highlight light. Fit a reflector with a grid. The grid narrows the beam, so you can aim it at the backdrop without light spilling onto the product. The result is a pool of brightness behind the item that adds depth and separation.
This setup is a good fit for beauty, drinks, and lifestyle products, where you want the image to look styled rather than purely documentary.
Lighting reflective and glossy products
Glass, metal, and glossy packaging reflect everything around them, including your lights. A few adjustments help:
- Use large, heavily diffused sources. A big soft reflection looks like a clean gradient. A small bare bulb shows up as a harsh dot.
- Bring in black cards at the sides to add dark edges that define the outline of clear bottles.
- Add a polarizer to cut glare and show the label or surface underneath.
- Move the light, not the product, until the reflections sit where they flatter the shape.
Clean reflections matter for AI editing too. Background removal on glass works far better when the edges are defined by deliberate dark lines rather than random reflections of your room.
Camera settings that protect your lighting
Good light can still be undone by automatic settings that shift between frames. For consistent results:
- ISO 100 keeps noise low.
- f/8 to f/11 keeps the whole product sharp from front to back.
- A shutter speed within your flash sync limit if you're using strobes.
- Manual white balance, set once for your lights, so colors don't drift.
- A tripod, or tethered shooting to a laptop, so framing stays locked and you can check images on a larger screen.
- Check the histogram so the brightest areas of the product don't clip to pure white and lose detail.
Locking these settings is what makes a batch of fifty products look like a single, coherent catalog.
Match your lighting to where the image will appear
Different channels call for different lighting.
Marketplace listings. Here you need even, nearly shadowless light that shows exactly what the customer is buying. Amazon requires a white background for the main image, and Shopify recommends consistent lighting across product variations. Flat, true-to-color lighting also shows the difference between matte and glossy finishes and the texture of fabric.
Marketing and ads. Here lighting becomes a storytelling tool. Directional side light can bring out premium materials and craftsmanship, and stronger shadows can add mood.
A practical approach is to shoot one clean, evenly lit master image per product. Then use AI to produce the marketing variations, rather than lighting every version separately. Consistency also builds trust, because when a product looks different on one platform than on another, customers notice.
Common lighting mistakes that make AI edits harder
- Mixing light sources. Window light plus a warm ceiling bulb gives uneven color casts that are hard to correct.
- Light too small or too far away. You get hard shadows that fuse with the product edge.
- Overexposed backgrounds. If the light spills too bright onto the product edges, fine detail like fabric fuzz or thin straps disappears.
- Wrinkled or dirty backdrops. Every crease is something to clean up later.
- Changing setups mid-batch. Even small moves in light position break visual consistency.
From well-lit shot to finished asset
Once your lighting is dialed in, the remaining work is editing at scale. If you're processing a whole catalog, our guide on how to remove the background from image files in bulk walks through doing it without opening each file by hand. If you're looking to streamline the entire pipeline, from capture to final image, read about automated product photography workflows.
With EditorAI, you can take one evenly lit product photo and remove the background for a marketplace listing. You can also erase a stray dust spot or prop, or describe a new scene in plain text to create ad creative. EditorAI does all of this in one place, so a single good lighting session can feed your store, your social posts, and your campaigns.
The short version: use one soft light close to the product, add a reflector for fill, keep a clean white background, and lock your settings. Light it right once, and every edit after that gets faster.