
To automate product photo editing for Shopify, you need an integrated pipeline that replaces manual clipping paths and retouching with automated background removal, AI-driven contextual generation, and batch resizing. By standardizing your initial photo capture, passing images through automated tools that isolate products and render realistic lighting, and exporting them in uniform Shopify-ready dimensions, you can transform raw snapshots into high-converting product pages in minutes rather than spending days in manual post-production.
For fast-growing e-commerce stores, managing catalog imagery manually quickly becomes an operational roadblock. When you release new variants, introduce seasonal collections, or manage hundreds of SKUs, editing each file individually drains time and budget. Automating this process allows you to maintain catalog consistency, launch products faster, and drive higher conversion rates across your store.
The Bottleneck of Manual Photo Editing in E-Commerce
Running a Shopify store requires visual consistency. When customers browse a collection page, they expect to see clean images, uniform margins, true-to-life colors, and consistent background tones. Achieving this standard through traditional graphic design workflows creates several friction points:
- Time-consuming clipping paths: Manually cutting around intricate edges, laces, jewelry links, or glass reflections in desktop software takes anywhere from five to twenty minutes per angle.
- Inconsistent studio lighting: Unless you shoot every single product under identical studio lighting setups, raw images will vary in brightness, color temperature, and shadow depth.
- Delayed product drops: Inventory frequently arrives before marketing imagery is ready. Waiting on photo retouchers holds up listings and costs revenue.
- High outsourcing expenses: Freelance retouching costs add up quickly as catalogs expand, eating into product profit margins.
By automating repetitive post-production tasks, you free your team to focus on inventory management, merchandising, and ad campaigns.
Step 1: Standardize the Input (Capture)
Automation relies on predictable inputs. While modern AI models can correct many lighting and background mistakes, establishing a baseline photography standard makes automated editing faster and more accurate.
You do not need a five-figure commercial studio to produce high-grade raw files. As we cover in our guide on how to create studio quality product shots at home, a smartphone on a tripod, consistent diffuse lighting, and a plain backdrop are enough to yield great raw shots.
To prepare your images for smooth automated processing, follow these rules:
- Keep the camera distance consistent: Place your camera or phone at a fixed distance and height for every angle of a product type. This simplifies automatic cropping.
- Diffuse your light source: Harsh reflections and deep, chaotic shadows make edge detection harder. Use softboxes or position your shoot near an indirect natural light source.
- Use contrasting backgrounds: Place dark items against light surfaces and light items against neutral gray or off-white. Clear contrast helps background removal algorithms accurately detect complex silhouettes.
- Standardize file naming: Label your raw files before uploading them (for example,
SKU-001_front.jpgandSKU-001_detail.jpg). Clear naming maintains file order when your automated pipeline runs.
Step 2: Automate Background Removal and Cutouts
The most labor-intensive part of e-commerce editing is isolating the product from its environment. Automated background removal tools use machine learning to segment the foreground subject from the background instantly.
Automated segmentation detects subtle details like fine stitching, shoe laces, hair, and transparent materials without requiring manual pen-tool selections. When setting up automated background removal for your Shopify workflow:
- Automate primary cuts: Let the software isolate the product subject automatically upon file upload.
- Generate pure white backgrounds for main listings: Marketplaces and Shopify collection grids convert best when primary images feature clean white (#FFFFFF) backgrounds.
- Retain or recreate natural contact shadows: Floating products look artificial. A good automated pipeline either preserves the ground shadow from the original shot or applies a subtle, directional drop shadow beneath the item.
Step 3: Generate Contextual Staging and Lifestyle Scenes
While clean white backgrounds are ideal for your primary product photo, secondary images should show products in real-world contexts. Lifestyle imagery helps shoppers visualize scale, material texture, and usage, which directly influences purchasing decisions.
Traditionally, staging lifestyle shots required renting locations, staging props, and booking photographers. Today, virtual staging lets you generate these environments on demand. To understand how the economics of digital generation compare to traditional shoots, read our analysis on understanding the cost of virtual photography.
Using EditorAI, you can take a standard cutout or rough product snapshot and place it into a styled commercial environment using simple text prompts. Instead of staging physical sets, you describe the surface, background, and mood you want.


Our platform automatically calculates realistic lighting reflections, surface bounce, and shadows that match the generated setting. Through EditorAI for e-commerce, merchants turn single product angles into full lifestyle sets without setting foot on a commercial soundstage.
Step 4: Automate Resizing, Margins, and Shopify Formatting
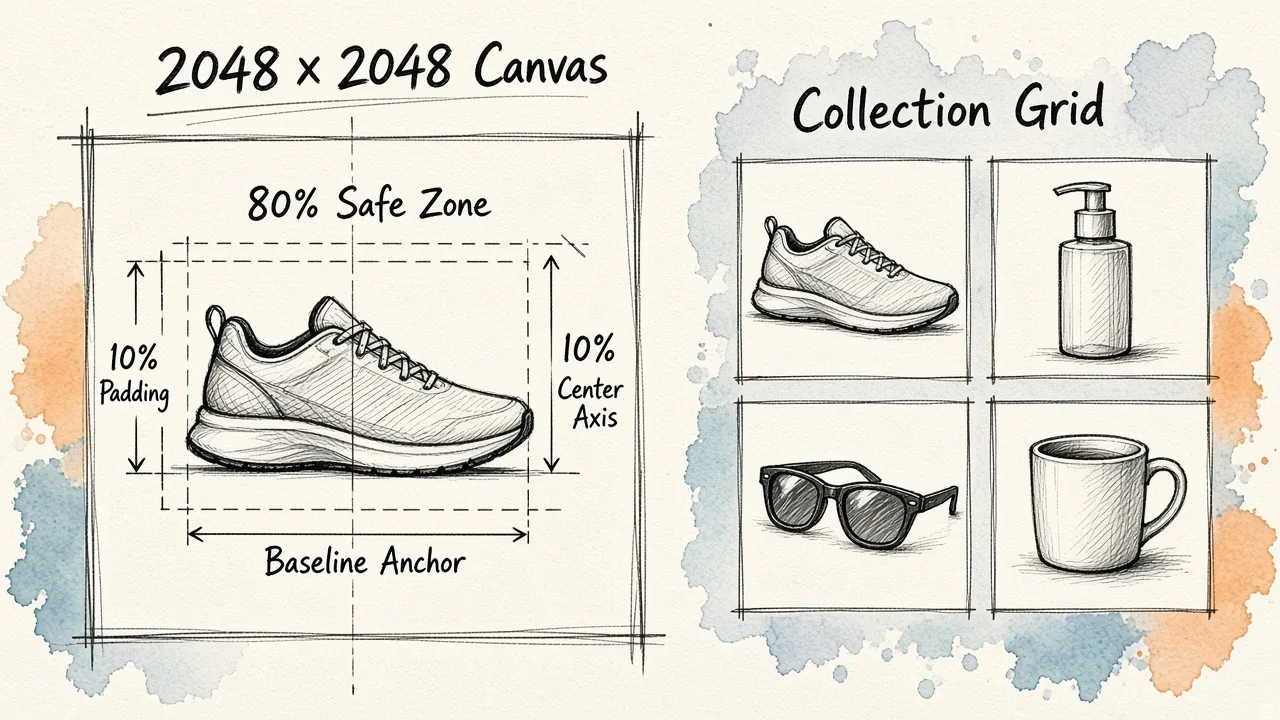
A common visual issue on Shopify stores is inconsistent product scale across collection grids. When one shoe occupies ninety percent of the image frame and another occupies sixty percent, the catalog looks messy.
Automating your formatting requires establishing a fixed image template:
- Choose a uniform aspect ratio: The square format (1:1 aspect ratio, typically 2048 x 2048 pixels) remains the standard for Shopify themes. It provides enough resolution for smooth zoom functionality without slowing down page load speeds.
- Lock your inner padding: Configure your automation tool to scale every product so it occupies a fixed percentage of the canvas (usually 80% to 85%). This leaves equal breathing room around every item on your collection pages.
- Center alignment: Set alignment rules so products automatically align to the center-horizontal axis and anchor along a uniform baseline.
- File compression: High-resolution uncompressed images degrade page load times, which harms SEO rankings and mobile conversion rates. Use automated export routines that deliver optimized WebP or progressive JPEG files.
Step 5: Build a Hands-Off Batch Processing Workflow
To handle incoming product lines without manual intervention, organize your editing steps into a repeatable pipeline. If you want to compare different software configurations, see our breakdown of the best automated product photography tools for e-commerce.
A complete automated batch workflow follows this sequence:
- Drop raw images into a shared folder or queue: Place your unedited shoot files into a designated folder named after the product line or collection.
- Run batch background removal: The automated tool strips the background, isolates the subject, and drops it onto your chosen default canvas.
- Apply standardized styling presets: Run secondary images through your staging templates, generating lifestyle scenes or ambient colored backdrops tailored to your brand identity.
- Standardize dimensions and margins: Apply your 2048 x 2048 pixel canvas preset, padding the product by 15% on all sides and centering the object.
- Direct export to Shopify: Upload the finalized images to Shopify using the Files manager, a CSV import, or your catalog app integration, tying each image directly to its corresponding SKU.
By keeping these steps programmatic, you eliminate back-and-forth editing cycles and process fifty product photos in the time it used to take to clip one.
Common Mistakes to Avoid in Automated Workflows
While automation eliminates manual labor, unattended pipelines can produce visual defects if you do not review your settings. Watch out for these common issues:
Stripping Ground Shadows Completely
Removing backgrounds without regenerating ground contact makes items look like they are floating in blank space. Ensure your automated workflow includes a step to preserve contact shadows or render a soft, realistic drop shadow beneath the base.
Color Distortion
Automated color correction can accidentally shift tones if your raw shot had mixed light sources. Always check that your automated presets preserve accurate product colors. If a customer receives a jacket that looks navy blue online but green in person, returns will rise.
Over-Aggressive Edge Smoothing
Some automated background removal models blur product edges to hide rough cuts. On hard-edged products like electronics, watches, or furniture, this creates an unconvincing, blurry silhouette. Select tools that preserve crisp, realistic borders.
Neglecting Mobile Display Checks
An image crop that looks balanced on a desktop monitor may appear too small on a phone screen. When standardizing margins, preview your collection page templates on mobile devices to ensure the products fill enough of the viewport to remain clearly visible.
Building Consistency at Scale
Automating product photo editing for your Shopify store removes a major growth bottleneck. Instead of paying per image or waiting on outside retouchers, an automated workflow lets you capture raw photos, isolate items, generate lifestyle contexts, and format assets for your theme in minutes.
By standardizing your photography setup, using automated AI tools like EditorAI for staging, and enforcing strict canvas templates, you protect your brand presentation while scaling your store efficiently.