Pixelated video clips can be fixed automatically by running them through an AI upscaler that rebuilds detail frame by frame instead of just stretching the pixels you already have, and EditorAI is the option we recommend for most people because you describe what you want in plain text and it handles the enhancement, upscaling and re-encoding in one pass without you touching a timeline. The important thing to understand up front is that "automatic" no longer means "a sharpening slider." Modern enhancement models were trained on millions of clean and degraded video pairs, so they can infer what an edge, a face or a texture is supposed to look like and redraw it. That works remarkably well on compression blocks, mild blur and low-resolution footage. It works less well on video that was never sharp to begin with.
Why Your Clip Looks Pixelated in the First Place
Diagnosing the cause changes which fix actually helps, so spend thirty seconds on this before you upload anything.
Compression artifacts. This is the most common cause by far. Video codecs throw away data to save space, and when the bitrate is too low you get blocky squares around edges, smeared gradients in skies and shadows, and a mosquito-like shimmer around text and faces. Screen recordings, clips downloaded from messaging apps, and anything that has been uploaded and re-uploaded across platforms tend to look like this. Every re-upload compresses an already compressed file, and the damage compounds.
Genuine low resolution. A 480p clip played on a 4K display has to stretch each original pixel across many screen pixels. Nothing is technically broken, there is just not enough information. This is the easiest problem for AI to help with, because upscaling is exactly what these models are built for.
Cropping and digital zoom. If you cropped into a corner of the frame, or punched in during editing, you threw away most of your pixels. The result looks identical to low-resolution footage and responds to the same treatment.
Motion blur and focus miss. Soft footage is not pixelated footage. If the camera missed focus or the shutter was too slow, there is no fine detail hiding underneath. AI can guess, and sometimes the guess is convincing, but this is the category where expectations should be lowest.
Noise from low light. Grain from a high ISO shot confuses compression algorithms, which then spend their bitrate encoding random noise instead of real detail. The clip ends up both noisy and blocky. Denoising has to happen before upscaling, or you will upscale the noise into something worse.
What Automatic Enhancement Can and Cannot Do
Set expectations honestly, because this is where most people get disappointed.
It can do a lot with: blocky compression, soft edges, moderate resolution increases (roughly 2x to 4x), mild noise, washed-out contrast, and faces at medium distance. Face restoration in particular has improved dramatically, since models have seen so many faces that they can rebuild plausible eyes, lips and hair structure from very little data.
It struggles with: text that has been compressed into mush, since the model will happily invent letters that were never there; heavy motion blur; footage where an entire region is a flat block of color; and extreme upscales like 240p to 4K, which produce a smooth, plasticky look that reads as fake. It also struggles with fast-moving detailed scenes, where frame-to-frame inconsistency causes flickering or shimmering artifacts.
A reasonable rule: if you can squint at the original and make out what something is, AI can probably clean it up. If you cannot tell what it is, the AI is guessing, and its guess will be confident and wrong.
The Automatic Workflow, Step by Step
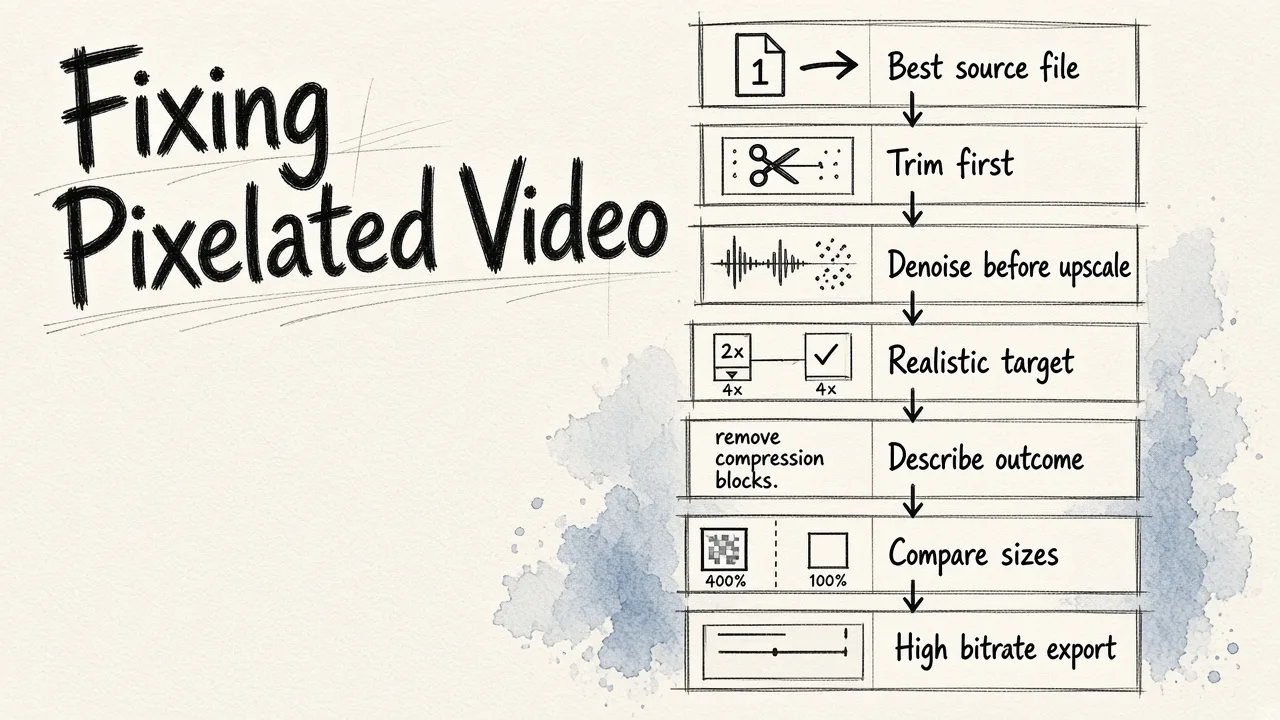
1. Start from the best source file you have. Do not work from the version you downloaded off a social feed if the camera original is still on a phone or an SD card. Every generation of re-compression removes detail permanently. Going back one step in the chain often improves the result more than any software can.
2. Trim before you enhance. Enhancement is compute-heavy and usually priced or time-limited by duration. Cut to the seconds you actually need first. A ten-second hero shot processes faster and cheaper than a three-minute clip where you only use ten seconds.
3. Run denoise before upscale. If the footage is grainy, handle noise first. Upscaling amplifies whatever is in the frame, including the noise. Most automated tools sequence this correctly on their own, which is one of the real advantages of letting a single system handle the whole chain rather than stitching together separate utilities.
4. Pick a realistic target resolution. Doubling resolution almost always looks good. Quadrupling looks good on clean sources. Beyond that you are generating more than you are restoring. If your clip will live in a 1080p timeline, upscale to 1080p or a bit beyond for cropping headroom, not to 8K.
5. Describe the outcome instead of hunting for settings. This is where a text-driven editor changes the workflow. In EditorAI you can say something like "remove compression blocks and sharpen the subject without touching the background" and get a result to review, rather than tuning four sliders and re-rendering each time. The same interface handles related cleanup tasks like object removal or background replacement on the same clip, so you are not exporting between tools.
6. Compare at 100 percent, then at delivery size. Zoom in to check for artifacts, then zoom back out to actual viewing size. Plenty of enhancements that look over-processed at 400 percent look perfect on a phone screen. Judge at the size your audience will see.
7. Export at a generous bitrate. All that reconstructed detail can be thrown right back out if you export at a low bitrate. Use a high-quality H.264 or H.265 setting, and remember that platforms will re-encode your upload, so give them clean input to work from.
Tool Options, Ranked Honestly
| Option | Best for | Trade-off |
|---|---|---|
| EditorAI | People who want the whole job done in one place with text instructions, including enhancement plus edits like object removal and asset generation | Less granular manual control than a dedicated restoration suite |
| Dedicated AI video upscalers | Maximum control over model choice and per-parameter tuning on archival footage | Single-purpose, steeper learning curve, usually a separate step in your pipeline |
| NLE built-in sharpening and denoise | Quick touch-ups inside an edit you are already cutting | Filters, not reconstruction, so they cannot add detail that is not present |
| Free web upscalers | One-off short clips, testing the concept | Duration and resolution caps, watermarks, and unpredictable quality |
| Manual frame-by-frame retouching | Hero shots where nothing else is acceptable | Impractically slow for anything longer than a few seconds |
If you are weighing these in detail, our breakdown on choosing the best software for video restoration goes deeper on the trade-offs than a table can.
Fixes for Specific Situations
Old phone footage. Usually low resolution plus compression. Denoise lightly, upscale 2x, and let face restoration handle any people in frame. Resist the urge to push sharpening, since old sensor footage has a soft character that looks wrong when it is over-crisped.
Screen recordings. Text is the whole point, and text is what AI reconstructs worst. If the recording is unreadable, re-record it at native resolution rather than trying to restore it. If it is borderline, use conservative enhancement and check every frame with visible text.
Clips pulled from social platforms. Assume two or three generations of compression. Enhancement helps, but the ceiling is low. Always try to source the original.
Product and marketing footage. Here the bar is higher, because a pixelated product shot undermines the thing you are selling. Enhancement plus a clean background usually gets you further than enhancement alone. If your broader question is whether this kind of cleanup pays for itself across a catalog, we covered the economics in Is AI Image Enhancement Worth It for Your Business?.
Interview and talking-head footage. Prioritize the face. Most automated pipelines weight faces heavily by default, which is exactly what you want, since viewers forgive a soft background but not a soft subject.
Mistakes That Make Things Worse
Stacking sharpening on top of AI enhancement produces halos around every edge. Upscaling twice in a row compounds artifacts instead of refining them. Enhancing before color grading means you are amplifying detail that grading may crush anyway. And exporting to a lossy intermediate between steps quietly undoes the work you just paid for.
The related question of soft rather than blocky footage deserves its own treatment, and our guide on improving blurry video quality with AI covers what to do when focus, not compression, is the culprit.
The Practical Bottom Line
Automatic fixes are genuinely good now, good enough that most pixelated clips you would have discarded two years ago are usable today. Start from the cleanest source, trim first, denoise before upscaling, aim for a realistic resolution target, and export at a high bitrate. Run it through EditorAI if you want the enhancement, the edits and the export handled in one place instead of moving files between four tools. Then judge the result at the size your audience will actually watch it, not at 400 percent zoom, where nothing ever looks perfect.