The fastest way to remove unwanted objects from images is to use an AI-powered inpainting tool that reconstructs the background behind whatever you erase, rather than cloning pixels by hand. With EditorAI, you describe what you want gone in plain text, or brush over it, and the edit is done in seconds instead of the ten to twenty minutes a careful manual retouch takes in a layer-based editor. That difference compounds fast: one photo is a minor annoyance, but a catalog of three hundred product shots with stray cables, price tags, and reflections in them is a week of work you can collapse into an afternoon.
This guide covers how object removal actually works, when to use each method, and how to keep results clean enough to publish.
What "Removing an Object" Really Means
Deleting a person, sign, or shadow from a photo is not deletion at all. It is invention. Once the pixels are gone, something has to fill the hole, and the quality of your result depends entirely on how well that filling matches the rest of the frame.
There are three broad approaches:
Clone and patch. You copy pixels from elsewhere in the image over the unwanted area. This is the oldest method and it still works for small, simple fixes on flat backgrounds. It is slow, it requires a steady hand, and it produces visible repetition on textured surfaces like grass, gravel, or fabric.
Content-aware fill. The software samples surrounding pixels and blends them algorithmically. Faster than cloning, decent on uniform backgrounds, but it tends to smear when the object sits across a hard edge, like a doorway or a horizon line.
Generative inpainting. An AI model looks at the whole scene, understands what is likely behind the object, and generates new pixels that match the lighting, perspective, and texture. This is the method that handles the hard cases: someone standing in front of a patterned wall, a tripod leg crossing a tiled floor, a watermark sitting on a face.
For anything beyond a dust spot, generative inpainting is both the fastest and the most accurate option.
The Fastest Workflow, Step by Step
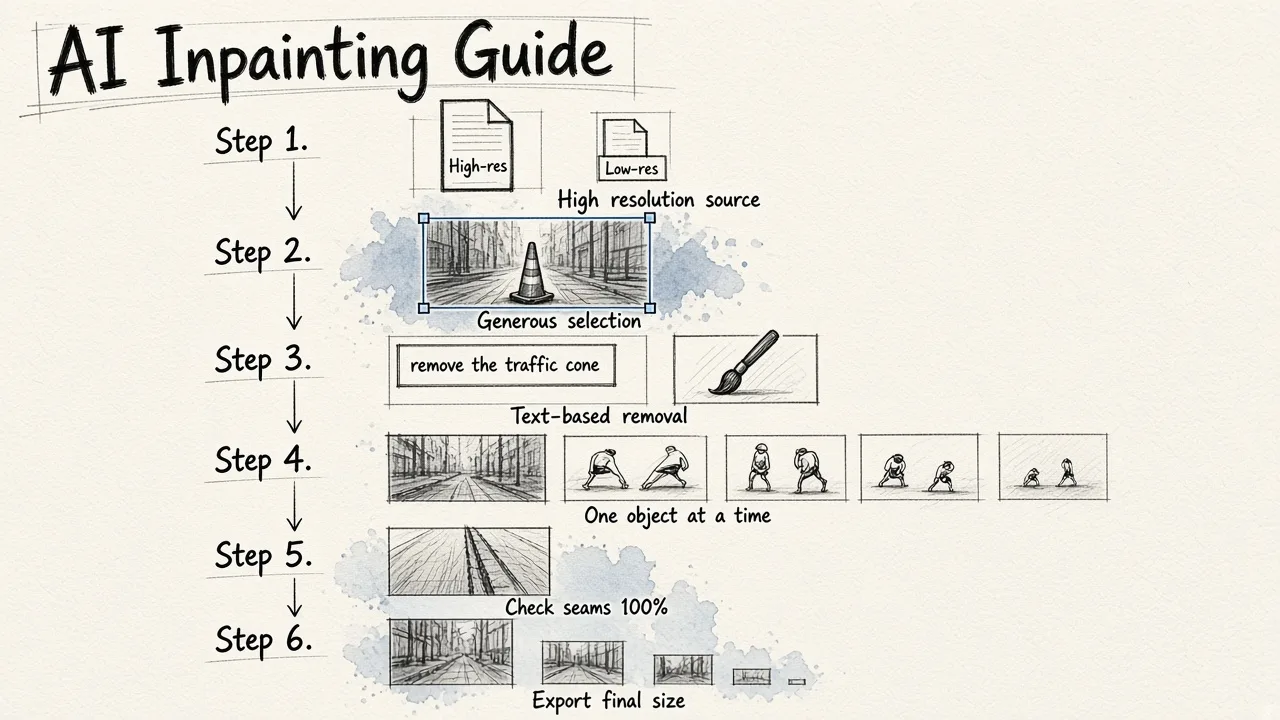
Here is the sequence that consistently produces publish-ready results without a lot of back-and-forth.
1. Start from the highest resolution file you have. Removal quality tracks directly with available detail. A 4000px original gives the model far more context to reconstruct from than a 900px web export. Do the removal first, then resize for delivery.
2. Select generously, not tightly. This is the most common mistake. People trace the object's exact outline, which leaves behind its shadow, its reflection, and the slight color cast it threw on nearby surfaces. Include a small margin of surrounding background in your selection. The AI needs room to blend.
3. Describe the object instead of masking it when you can. Text-based removal is dramatically faster than brushing. Typing "remove the traffic cone" or "remove the person in the red jacket" takes two seconds and skips the entire selection step. This is where EditorAI's text-driven approach saves the most time in practice, especially on images where the object has a complicated outline like hair, foliage, or chain-link fence.
4. Handle one object at a time on complex scenes. Removing four things at once gives the model four holes to reconcile simultaneously. Sequential removals give cleaner joins, and each one only takes a few seconds anyway.
5. Zoom to 100% and check the seams. Look at the boundary between generated and original pixels. Check for repeating texture, mismatched grain, and lighting that runs the wrong direction. If something is off, re-run with a slightly wider selection before you start manual touch-ups.
6. Re-export at the size you actually need. Removal on the full-size file, then downscale. Shrinking an image hides minor imperfections, so this order works in your favor.
When Each Method Wins
Not every removal needs the same tool. Matching the method to the job is most of the speed gain.
| Situation | Best method | Typical time |
|---|---|---|
| Dust spots, sensor marks, tiny blemishes | Spot heal or clone | Seconds |
| Person or object on a busy background | AI generative inpainting (EditorAI) | Seconds |
| Logo, watermark, or text overlay | AI generative inpainting | Seconds |
| Object crossing a hard structural edge | AI inpainting, then manual straighten | 1 to 3 minutes |
| Removing the entire background | Dedicated background removal | Seconds |
| Hundreds of images, same fix | Batch AI processing | Minutes total |
That last row is the one most people underestimate. If you are cleaning up a product catalog, a real estate listing set, or an event gallery, the per-image time matters less than whether you can run the operation across the whole set at once. Our guide on how to edit thousands of images quickly walks through structuring that kind of job so you are not clicking through files one by one.
The Four Cases That Break Most Tools
Object removal is easy until it is not. These are the scenarios where results fall apart, and what to do about each.
Shadows and reflections. You remove the chair but its shadow stays on the floor, and now the image reads as fake even if the viewer cannot say why. Always check the ground plane and any reflective surfaces like windows, glass tabletops, or polished floors. Treat the shadow as a second object and remove it separately.
Objects crossing strong lines. A ladder leaning across a wall-to-ceiling junction, a signpost cutting through a horizon. AI reconstruction of straight architectural lines is the weakest point in most models. If the regenerated line bends even slightly, the eye catches it instantly. Fix these with a wider selection, or accept a quick manual correction afterward.
Partially occluded subjects. Removing a person who is standing in front of your main subject means the tool has to invent part of that subject, not just the background. Results here are unpredictable. When possible, shoot or source an alternate frame instead.
Repeating patterns. Tile, brick, siding, printed fabric. The failure mode is a subtle misalignment in the repeat, which reads as a smudge. Generative models handle this far better than content-aware fill, but it is still worth a zoomed-in check.
Speed Tactics for Volume Work
If object removal is a regular part of your workflow rather than a one-off, a few habits cut the total time significantly.
Fix it at capture when you can. Thirty seconds spent moving a power cord out of frame saves five minutes of retouching later, multiplied by every shot in the session. This is the cheapest optimization available and the most frequently skipped.
Standardize your shots. If every product sits in the same spot against the same backdrop, the same removal instruction works across the entire set. Consistency is what makes batch processing possible in the first place, which is also the logic behind automating professional product photos end to end.
Batch the identical fixes. Watermarks, logos, timestamp overlays, and studio equipment usually appear in the same position across a shoot. Group those images and process them together instead of opening each one individually.
Do removal before anything else. Color grading, cropping, and resizing should all come after. If you grade first and then remove an object, the generated pixels have to match your grade rather than the neutral original, and matches get worse the further you are from the source file.
Keep the originals. Non-destructive workflows matter more with generative edits than traditional ones, because you may want to re-run a removal with different settings once you see it in context.
A Realistic Quality Check
Before you publish, run three quick tests. Zoom to 100% on the edited region and look for texture repetition. Flip the image horizontally, which resets your eye and makes asymmetric errors obvious. Then view it at the final display size, because an error invisible at 600px wide does not need fixing.
Most removals pass all three on the first attempt. The ones that do not usually need a wider selection rather than a different tool.
The practical bottom line: object removal stopped being a specialist skill the moment generative inpainting matured. What used to require layer masks, clone stamps, and a good eye now requires a sentence describing what should not be there. The remaining skill is knowing which images are worth fixing, which need a reshoot, and how to structure the work so you are processing batches instead of files.