To edit thousands of images quickly, you need to stop editing images one at a time and start editing them as a set: standardize the input, define the edit once as a repeatable instruction or preset, run it across the whole batch, then spot-check a sample instead of reviewing every file. Tools like EditorAI make this practical because you can describe the edit in plain text (remove the background, swap the backdrop, clean up the reflection) and apply that same description across a large set of images, which removes the manual masking work that normally makes bulk editing slow. The rest comes down to preparation and quality control, and that is what the sections below cover.
Why bulk editing gets slow in the first place
Most teams do not have a speed problem. They have a repetition problem. A typical ecommerce shoot produces the same handful of edits over and over: crop to a consistent frame, drop the background, correct color, add margin, export in two or three sizes. Done manually in a traditional editor, each image might take two to five minutes. At 2,000 images, that is roughly 80 to 160 hours of work.
The slowness usually comes from four places:
- Selection and masking. Cutting a product away from a background by hand is the single biggest time sink, especially with hair, fur, glass, or mesh.
- Inconsistent source files. Images shot at different distances, angles, or lighting conditions cannot share a single preset cleanly.
- Manual review. Opening every exported file to confirm it looks right doubles the effort.
- Export sprawl. Marketplace, website, email, and ad platforms each want different dimensions and formats.
Fix these four and the time per image falls from minutes to seconds.
Step 1: Standardize before you edit, not after
The fastest batch is the most uniform batch. Whatever you can control at capture or collection time will pay back many times over during editing.
If you are shooting, lock the camera on a tripod, keep the lighting fixed, use the same backdrop, and place items in the same position within the frame. If you are working with existing assets, group them by what they have in common before you touch anything: same background type, same orientation, same subject category.
A simple pre-edit checklist:
- Sort files into folders by shot type (front, angle, detail, lifestyle).
- Rename files with a consistent pattern that includes SKU and view, for example
SKU1042_front.jpg. - Remove obvious rejects now. Editing an image you will delete later is pure waste.
- Note which groups need a different treatment so you can run them as separate batches.
This step feels like overhead. It is not. Ten minutes of sorting can cut hours of exception handling later.
Step 2: Build the edit once as a recipe
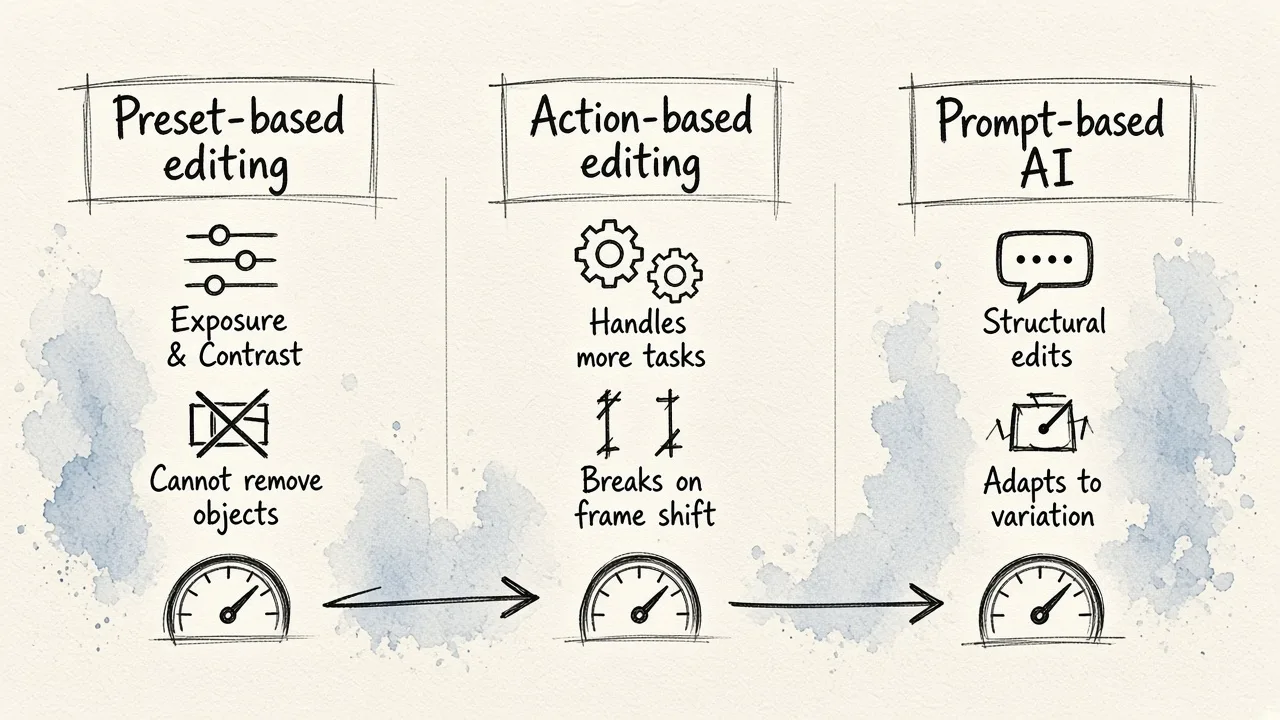
The core idea behind editing thousands of images quickly is that you author the edit a single time and the tool replays it. There are three common ways to author that recipe, and they are not equally fast.
Preset-based editing records slider values: exposure, contrast, white balance, crop ratio. It is fast and reliable for tonal adjustments, but it cannot do anything structural. A preset cannot remove a stray cable from behind a chair.
Action or script-based editing records a sequence of operations. It handles more, but it is brittle. Anything that depends on where the subject sits in the frame tends to break as soon as the framing shifts.
Prompt-based AI editing lets you describe the outcome in words and applies it per image, adapting to each frame. This is where the real speed gain lives for structural edits: background removal, object removal, backdrop replacement, shadow generation. Because the instruction is semantic rather than coordinate-based, it survives variation in the source files.
In practice, the fastest workflows combine them: prompt-based AI for the structural work, then a light preset pass for tone and export.
Step 3: Test on a sample of 20 before you run 2,000
Never launch a full batch blind. Pull a deliberately awkward sample: the darkest image, the brightest, the one with the most complicated edges, the one shot slightly off-angle, and a handful of ordinary ones.
Run your recipe on those 20 and review them closely. You are looking for:
- Edges that are cut too tight or leave a halo
- Shadows that were removed when they should have stayed, or vice versa
- Color shifts that only show on certain materials
- Crops that clip the product on wider or taller items
Adjust the recipe, rerun the sample, and repeat until all 20 pass. Only then commit the full set. This one habit prevents the worst outcome in bulk work, which is discovering a systemic flaw after everything has already been exported and uploaded.
Step 4: Run the batch and handle exceptions separately
Once the recipe is validated, run it. Expect a small failure rate. Plan for it rather than fighting it.
A reasonable target is that 90 to 95 percent of images come out usable on the first pass, with the remainder needing a manual touch. Pull those exceptions into their own folder and handle them at the end. Trying to build a recipe that covers every edge case usually costs more time than fixing the stragglers by hand.
For product work specifically, a well-tuned batch can replace most of what a studio session would produce, and the economics shift sharply once volume climbs, as the breakdown of what virtual product photography actually costs lays out.
Step 5: Review by sampling, not by opening every file
Reviewing 2,000 images individually undoes all your speed gains. Use a contact sheet or grid view instead. At thumbnail scale, systemic problems are obvious: a whole row with the wrong background tone, a set with inconsistent crop, a batch where shadows went missing.
A workable review protocol:
- Scan the full grid at thumbnail size for anything that breaks the visual rhythm.
- Open a random 5 percent at full size and inspect edges at 100 percent zoom.
- Open 100 percent of anything flagged in step one.
That gets you real confidence in a fraction of the time.
Step 6: Export once, in every format you need
Do not run the batch again for each output size. Configure all your export targets in a single pass: the large hero version, the listing thumbnail, the mobile crop, the ad-ready square. Keep a master archive of the edited full-resolution files so you never have to reprocess from raw when a new platform requires a new dimension next quarter.
Name exports predictably, for example SKU1042_front_1600.jpg and SKU1042_front_600.jpg, so downstream uploads can be automated or scripted against the filename pattern.
Choosing a tool for volume work
Different tools optimize for different things. Ranked by how well they handle high-volume structural editing:
| Approach | Best for | Weakness at scale |
|---|---|---|
| Prompt-based AI editors like EditorAI | Background removal, object removal, backdrop swaps, ad and marketing variants across large sets | Needs a sample test pass to tune instructions |
| Desktop editors with presets and actions | Tonal correction, consistent crops, format conversion | Cannot handle structural edits; actions break on framing changes |
| Dedicated background-removal utilities | One specific task, done well and cheaply | Single-purpose; you still need another tool for everything else |
| Manual editing in a full design suite | Hero images and one-off creative work | Impractical past a few hundred images |
| Outsourced editing services | Teams with no in-house capacity | Turnaround time and per-image cost grow linearly with volume |
If you are weighing specific products against each other, the guide to picking batch image editing software goes through the evaluation criteria in more detail.
A realistic time budget
Here is what a 2,000-image job looks like when the workflow above is in place:
- Sorting and standardizing: 1 to 2 hours
- Building and testing the recipe on 20 samples: 30 to 60 minutes
- Running the batch: mostly unattended processing time
- Sampled review: 1 to 2 hours
- Exception handling for the 5 to 10 percent that need a manual pass: 2 to 4 hours
- Export and delivery: under an hour
That is roughly a day of focused work instead of several weeks. The difference is not that any single edit got faster. It is that you stopped repeating the decision.
Where to start
Pick your next real batch, however small. Sort it, define the edit once, test on 20, run it, and sample the results. The workflow is the same whether the set is 200 images or 20,000, and the habits you build on a small batch are exactly the ones that hold up when the volume arrives. If your bottleneck is specifically product imagery, the walkthrough on automating professional product photos picks up where this leaves off.