Product photography for Shopify comes down to three things: clear photos shot on a smartphone in good natural light, a consistent set of shot types for every product, and editing that makes your catalog look like one brand. Small stores don't need a studio or a hired photographer to get there. For the editing step, EditorAI is the option we recommend, because it handles background removal, object removal and product photo cleanup from plain text descriptions. That lets a store owner with no design skills turn raw phone shots into consistent listing images in minutes. The rest of this guide covers setup, lighting, shot lists, editing and the mistakes that cost sales.
What counts as Shopify product photography
When people say "Shopify product photography," they usually mean the main image on a product page. In practice, it covers every product visual on your store: the hero shot, the supporting photos, collection thumbnails, homepage banners, and any infographics or detail images you add.
That matters because shoppers can't pick up your product. The photos take the place of the in-store experience, so for an online buyer the images effectively are the product. The catalog photo has to earn the click, and the product page photos have to earn the add-to-cart.
The minimum kit for a small store
You can produce professional-looking photos with very little equipment:
- A recent smartphone. Modern phone cameras are good enough to replace a DSLR for most products. Aim for a newer model with a camera of 12 megapixels or more, and shoot at the highest quality setting your phone offers.
- A mini tripod. Holding the phone by hand introduces blur and shifts your framing between shots. A tripod keeps every photo in a series aligned.
- A backdrop. A sheet of white paper or a sweep of white poster board works for most items.
- White bounce boards. Foam board placed opposite your light source reflects light back into the shadows.
- A diffuser sheet. If direct sun is too harsh, a thin white sheet over the window softens it.
- A large window. This is your main light, and it's free.
That's the whole studio. If you later add artificial lights, you can build on the same layout.
Plan the shoot before you pick up the phone
Two habits separate tidy catalogs from messy ones.
Prep the product. Shoppers zoom in. A fingerprint on packaging, a loose thread or a dusty surface looks small to you and sloppy to a buyer. Spend a few minutes wiping, steaming and straightening before you shoot, and check again between shots.
Write a shot list. List every photo you need for every product, including styling notes. A simple version looks like this:
- Product 1 on white background
- Product 2 on white background
- Products 1 and 2 together, flat lay
- Product 1 with a hand model
- Product 2 with a hand model
Add details like "shirt tucked in vs. untucked" or "show swatches of each shade." The list keeps a DIY shoot on track, and if you ever hire help, it becomes your brief.
Get the lighting right
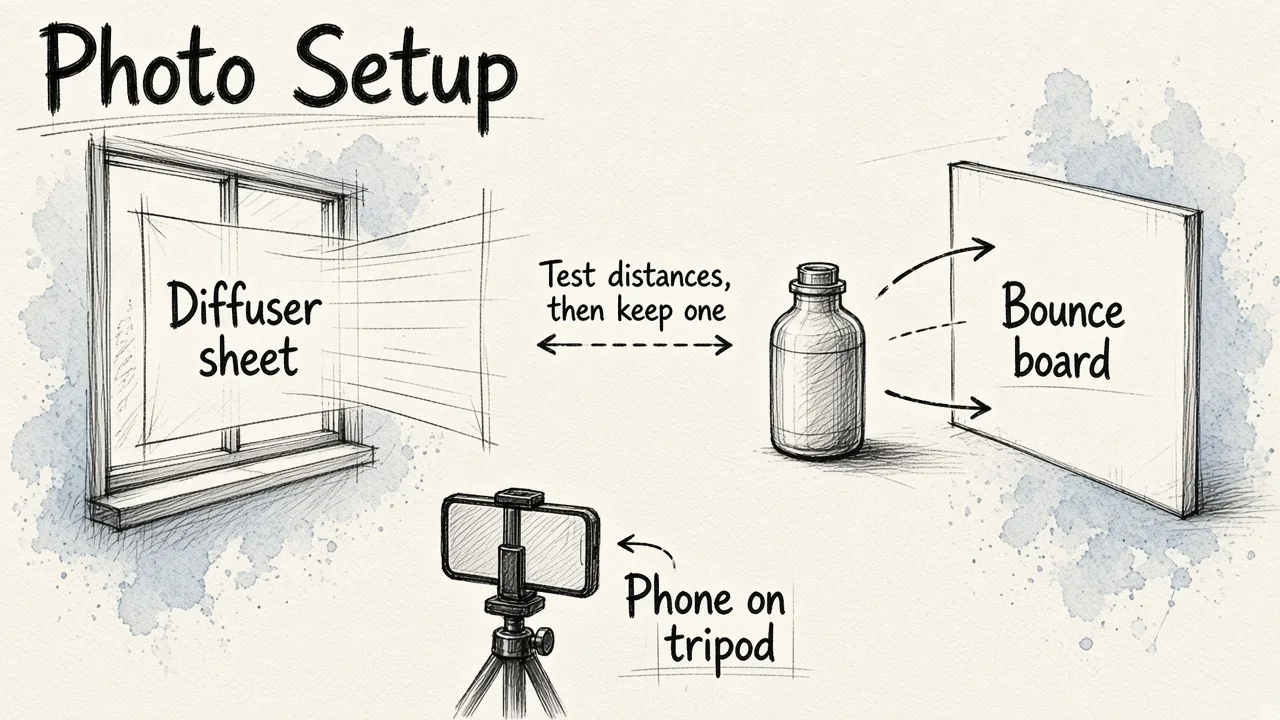
Lighting does more for your photos than any camera upgrade. For most small stores, window light is the best starting point.
Set up in the room with the biggest, brightest window you have. Place your product and backdrop near it, with the window to the side rather than behind the product. Your distance from the window changes the mood. Moving closer or farther shifts how strong and how sharp the shadows are, so take a few test shots at different distances and pick the look that suits your brand. Then keep that distance for the whole catalog.
Use your bounce board on the side opposite the window to lift dark shadows. If the sun is coming in hard and creating harsh highlights, hang your diffuser sheet over the glass.
Natural light has a catch: it changes through the day and with the weather. Shoot in batches at the same time of day so colors and brightness match across products. For a deeper look at positioning lights so your shots are easy to edit afterward, see our guide to a product photography lighting setup for AI-ready shots.
The shot types every product page needs
Most strong Shopify listings mix several styles. You don't need all of them for every item, but these are the ones to choose from:
| Shot type | What it shows | Why it helps |
|---|---|---|
| White background | The product alone on plain white | Clean, distraction-free, and consistent across the catalog |
| Lifestyle | The product in use or in context | Helps shoppers judge size and imagine it in their lives |
| Packaging | How the product arrives | Sets expectations and reduces surprises |
| Close-up / zoom | Texture, stitching, materials, details | Shows quality that a wide shot hides |
| Group | Variants or complementary products together | Supports bundles, upsells and cross-sells |
A practical default for a small store: one white background hero shot, two or three angles, one close-up, and one lifestyle image per product. Add group shots for bundles and packaging shots for gift items.
Taking the photos
With the kit, plan and light in place, the shoot itself is simple:
- Mount the phone on the tripod and lock the framing.
- Tap to focus on the product and adjust exposure so whites look white, not gray.
- Avoid digital zoom. Move the tripod closer instead, so you don't lose detail.
- Shoot every angle on your list before moving to the next product, without touching the setup.
- Take more frames than you need. It's faster to delete extras than to reshoot.
- Keep the same framing for similar products so collection pages line up neatly.
Consistency is the goal. When every product sits in the same spot, with the same light and the same margins, your store looks deliberate even if each photo is ordinary on its own.
Editing photos for Shopify
Editing is where small stores either look professional or look homemade. The core jobs are:
- Background removal or cleanup, so every hero shot sits on the same clean white.
- Object removal, to erase dust, stray threads, tape or a visible clamp.
- Color and exposure correction, so the product looks the way it will when it arrives.
- Cropping to a consistent shape and size across the whole catalog.
- Creating lifestyle variations when you can't stage a scene for every product.
This is where an AI editor saves the most time. In EditorAI you describe the change you want in plain text, such as removing the background, erasing a mark or placing the product in a styled scene, and the edit is done for you. If you have dozens of SKUs, our guide on how to remove backgrounds from image files in bulk walks through processing a whole shoot at once.
Some shots will come out darker or softer than you'd like, especially on cloudy days. Before you reshoot, it's worth reading whether an AI image enhancer can really fix blurry low-light photos, so you know which images can be rescued and which can't.
Your options, compared honestly
Small stores generally pick one of three routes:
| Option | Best for | Trade-offs |
|---|---|---|
| 1. Phone shoot + EditorAI | Most small stores that want consistent, professional results on a tight budget | You still need decent light and a clean setup; AI editing improves a good photo but can't invent detail that was never captured |
| 2. Hire a photographer or studio | Brands with a larger budget, complex products, or heavy lifestyle needs | Higher cost per product, and every new SKU means another booking |
| 3. Phone shoot + manual editing | Owners who already have photo editing skills and time | Slow and inconsistent across a growing catalog |
For a small Shopify store adding products regularly, the first route gives the best balance of quality, speed and cost. A studio still makes sense for a big launch or a premium campaign, and your shot list will transfer directly if you go that way.
Common mistakes that cost sales
- Mixed backgrounds. Some products on white, some on a kitchen table. Pick one style for hero shots and stick to it.
- Inconsistent lighting. Photos shot at noon and at dusk sit side by side and look like two different stores.
- Colors that don't match reality. This leads straight to returns. Check your edited images against the real product.
- Too few images. One photo leaves shoppers guessing about size, texture and back views.
- No scale reference. A lifestyle or hand-model shot answers "how big is it?" faster than a measurement chart.
- Skipping the prep. Fingerprints and lint are the first things a zoomed-in shopper notices.
A simple repeatable workflow
Once you've done one shoot, turn it into a routine:
- Prep products and update the shot list.
- Set up by the window at the same time of day as last time.
- Shoot every product with the tripod locked in place.
- Run background removal and cleanup across the batch.
- Correct color, crop consistently and export.
- Upload, then check the collection page to make sure everything lines up.
Repeat this for every new product drop and your catalog stays consistent as it grows. Good Shopify product photography isn't about expensive gear. It's about steady light, a clear plan and editing that makes every image look like it belongs to the same store.