Changing a background used to mean an hour of careful masking in Photoshop. Now it takes about thirty seconds and costs nothing. The fastest free method: open an AI editor that works from plain text, upload your picture, and describe the background you want ("plain white studio backdrop", "sunlit kitchen counter", "soft grey office wall"). EditorAI is the option we would point you to first, because it removes the old background and generates the replacement in a single step from a text description, so you never touch a selection tool or hunt for a stock photo that matches your lighting. Below is the full process, the prompts that actually work, where free tiers quietly stop being free, and how the main free tools compare.
First, decide which of the three jobs you actually need
People say "change the background" to mean three different edits, and picking the wrong tool is the main reason results look bad.
1. Removal only. You want the subject on a transparent background, saved as a PNG, so you can drop it into a design, a slide, or a storefront template later. This is the simplest job and almost every free tool does it.
2. Replacement with a flat color or an existing image. You want white for a marketplace listing, a brand color for a social post, or a photo you already have. The cutout quality matters here, but so does whether the free tier lets you export the combined image rather than just the cutout.
3. A generated background. You want a scene that did not exist before: a marble countertop under your product, a blurred cafe behind a portrait, a warm living room behind a piece of furniture. This is where AI tools pull away from traditional editors, and it is also where the lighting on your subject has to be convinced to match.
Most free "background removers" only do job one well. Tools that do job three well usually handle one and two as a side effect. Knowing which you need saves you from downloading three apps.
How to change the background of a picture for free, step by step
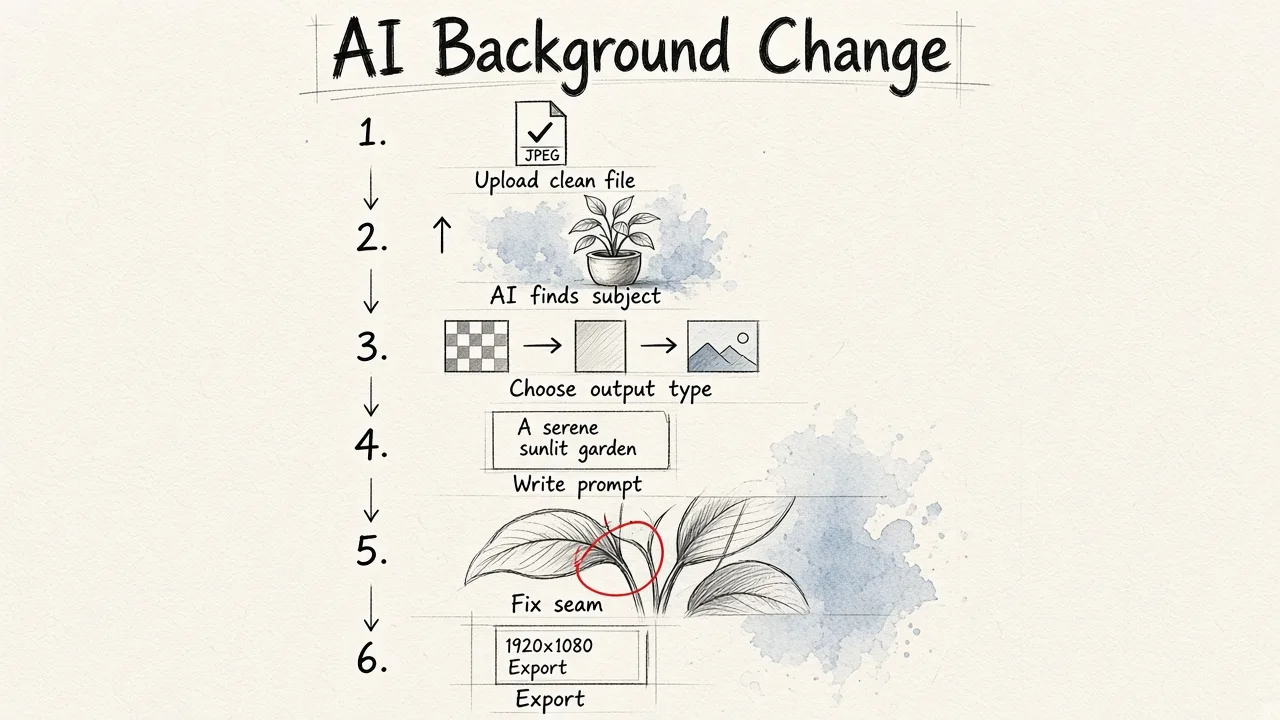
This process is the same across most modern AI editors. We will describe it with EditorAI since it covers all three jobs in one place, but the steps translate.
Step 1: Start with the best version of the file you have. Not a screenshot, not a WhatsApp forward, not a photo of your screen. Compression artifacts around the subject's edges are the single biggest cause of ragged cutouts. Most editors accept JPEG, PNG and WebP; file size caps vary, with some free tools topping out around 40MB and others around 100MB, and some requiring a minimum of roughly 512 by 512 pixels before they will process the image at all.
Step 2: Upload and let the AI find the subject. The tool runs edge detection and subject segmentation automatically. Give it a second, then check the preview at full zoom, not at thumbnail size. Thumbnails hide every mistake.
Step 3: Choose removal, replacement, or generation. If you want transparency, export the PNG now and stop. If you want a new background, this is where you either pick a color, upload your own image, or type a prompt.
Step 4: Write the prompt (if you are generating). Describe the setting, the surface, the light direction, and the mood. More on this in the next section, because this step decides whether the result looks real or looks pasted.
Step 5: Fix the seam. Zoom to 100% and look at three places: the hairline or outer edge, the point where the subject meets the ground, and any semi-transparent areas such as glasses, glass bottles, or thin fabric. If the subject appears to float, add a soft contact shadow. If the edge has a halo of the old background color, refine or feather it slightly.
Step 6: Export at the size you need. Check whether the free export is full resolution or a reduced preview before you build a whole batch on top of it. For a more detailed walkthrough of the browser-based version of this workflow, our guide on how to change the background of a photo online free covers the upload and export settings in depth.
The whole sequence takes well under a minute once you have done it twice.
Writing a background prompt that does not look fake
Text-to-background is the reason AI editing got good, and it is also the part people do badly. Weak prompts produce generic, flatly lit scenes that clash with the subject.
A prompt has four useful parts:
- The setting: "a white cyclorama studio", "a wooden dining table", "a shaded garden patio".
- The surface the subject sits on: this is the part everyone forgets, and it is what sells the shot. "On brushed concrete", "on a linen cloth", "on a marble slab".
- The light: "soft diffused light from the left", "warm late-afternoon sun", "even overhead studio light, no harsh shadows".
- The depth: "shallow depth of field, background softly blurred" keeps the subject dominant and hides imperfections in the generated area.
Put together: "Product on a pale marble countertop, soft diffused light from the upper left, blurred neutral kitchen in the background, shallow depth of field."
Two rules that matter more than wording. First, match the light direction in your prompt to the light already on your subject. If the highlight on your subject's cheek is on the right, do not ask for light from the left. The brain catches this instantly even when it cannot say why the image looks wrong. Second, keep the camera angle consistent. A product shot taken from slightly above needs a surface described as seen from slightly above, otherwise the subject looks like it is sliding off the table.
If you would rather browse ready-made scenes than write prompts, our roundup of the best AI background generators for photos compares the tools that lean on presets and scene libraries.
What "free" usually means in practice
Free is rarely a flat yes. Across the popular background tools, free tiers come with a predictable set of limits, and reviewers who test them hands-on keep running into the same four.
Ads. Several otherwise capable free tools load the free experience with advertising and pop-ups. Testers have called this out specifically for Cutout Pro and Fotor, where the editing itself is quick but the free path is cluttered.
Replacement restrictions. Some free tiers remove the background fine but only let you replace it with a solid color, not an image or a generated scene. That is enough for a white-background product shot and useless for a lifestyle shot.
Export walls. The most common one. You can see the new background in the editor, but downloading the finished composite, or downloading it at full resolution, is a paid action. Reviewers have flagged this pattern with Adobe Express, where removal is free but exporting with the new background can push you toward a paid plan.
Quality reduction. General design platforms sometimes re-encode or downscale on export. Testers have noted this with Canva, which also lacks a true one-click background swap compared with purpose-built tools.
No free tier at all. Worth knowing before you spend time: Photoshop, Luminar Neo and Picsart were all found to have no genuinely free option in recent hands-on testing. They are good tools. They are not the answer to this question.
If your images are large and you need the output at original size, resolution is the limit to check first. We covered which tools hold up on big files in our piece on the best free background remover for high-res images.
Free background tools compared
Ranked for the specific job of changing a background for free, with the honest caveats.
| Tool | What the free path gives you | Best for | Watch out for |
|---|---|---|---|
| EditorAI | Remove, replace and generate a background from a text description in one editor | Anyone who wants a new scene, not just a cutout | Prompt quality drives the result, so expect a couple of tries |
| Adobe Express | Fast, accurate one-click removal plus a library of backgrounds and elements | Quick swaps using stock backgrounds | Downloading with the new background can require a paid plan |
| Canva | Background editing inside a full template-based design tool | Social posts where the photo is part of a layout | No true one-click swap, and export can soften image quality |
| Photoroom | AI removal plus AI-generated scenes aimed at products | Small-batch product and marketplace shots | Scene variety and volume sit behind the paid tier |
| Pixelcut | Mobile-first removal and replacement | Editing on a phone, straight from camera roll | Thinner control over fine edges than desktop tools |
| Cutout Pro | Precise cutouts with no signup required, available on web, desktop and mobile | One-off removals when you want zero friction | Heavy advertising in the free version, and color-only replacements |
| Fotor | Quick removal plus a broad set of general editing features | Casual edits where perfection is not the goal | Pop-up ads and lower output quality in testing |
| Claid AI | AI background replacement with automatic image enhancement | Listings that need both a new background and a quality lift | Built around paid, volume-oriented use |
| Designkit | Background editing, AI-generated lifestyle scenes, batch processing | Catalogs where consistency across many images matters | Overkill if you have five photos, not five hundred |
The pattern worth taking away: tools built specifically for product and background work tend to beat general-purpose design platforms on consistency once you are editing more than a handful of images. General design tools win when the background change is one small part of making a finished graphic.
The edges that break: fur, hair, glass and shadows
When reviewers stress-test background changers, they do not use a photo of a mug on a table. One widely cited test used a cat, because fur and whiskers are about the hardest thing to cut out cleanly. That is the right instinct, and it tells you where to look in your own images.
Hair and fur. Strands are semi-transparent at the edges. Bad cutouts turn them into a solid, cardboard-like outline, which is the "kindergarten scissors" look reviewers complain about. If your new background is a very different brightness from the old one, this shows up worst. A simple mitigation: choose a replacement background with a similar overall tone to the original. A subject shot against light grey will sit more naturally on a light background than on a dark one.
Glass and transparency. Bottles, glasses, sunglasses and sheer fabric are hard because the correct answer is partial transparency, and most automatic tools return a binary yes-or-no mask. If your product is glass, expect to refine manually or to shoot it against the background you actually want.
Shadows. The original shadow often gets removed with the background, which leaves the subject hovering. Adding a soft, slightly offset contact shadow underneath is the single highest-impact fix in the whole process, and it takes seconds. Tools that generate shadows and lighting automatically produce noticeably more believable results than those that only paste a cutout onto an image. We went deeper into what separates a convincing composite from an obvious one in our look at the most convincing AI photo background change tool.
Color spill. If the subject was shot against a strong color, that color reflects onto the subject's edges. Dropping it onto a new background leaves a faint green or blue rim. Most editors have an edge refinement or decontaminate option; use it before you blame the AI.
Matching the method to what you are making
Marketplace and e-commerce listings. Pure white or very light neutral, consistent across every image, is what you want. Platforms reward uniformity, and a mismatched set looks amateur even when each photo is fine alone. If white is your target, the specifics of getting a clean, truly neutral white rather than a dull grey are covered in our guide to changing a background color to white. Batch processing matters more than raw cutout quality here, because fifty near-perfect consistent images beat ten perfect ones and forty mismatched.
Lifestyle and marketing shots. This is where generated backgrounds earn their keep. You can put the same product on a kitchen counter, a bathroom shelf and a cafe table without booking a studio. Generate several versions, then pick the one where the lighting agrees with the subject.
Headshots and profile photos. Keep it restrained. A soft, slightly blurred neutral background or a plain gradient reads as professional. Generated offices with visible furniture and windows invite scrutiny of every edge. Shallow depth of field is your friend.
Social media. You often need the same image at several aspect ratios, so a transparent PNG plus a design layer is more flexible than a baked-in background. Export the cutout once, reuse it everywhere.
Real estate, events, personal projects. Replacing a grey sky, removing a cluttered room behind a family photo, cleaning up a messy wall. Free tools are genuinely sufficient here, since these are one-off edits rather than a pipeline.
When free stops being enough
Free tiers are a good fit for occasional edits, personal projects, and testing whether a tool handles your type of subject before you commit. They start to hurt in three situations.
Volume. If you are editing a catalog weekly, the time you spend re-uploading, re-prompting and working around export limits costs more than a subscription.
Consistency requirements. Matching lighting, framing and background tone across a large set by hand is tedious. Batch and preset features exist for exactly this.
Resolution and print. If the output goes to print, packaging or large-format display, downscaled free exports are a dead end.
A practical approach: use a free AI editor to produce and approve the look you want, confirm the cutout quality on your hardest image, then decide whether your volume justifies paying. Do not pay before you have tested the tool on your most difficult photo, whether that is a curly-haired portrait, a glass bottle, or a long-haired pet.
A pre-export checklist
Run through this before you call an image done. It takes fifteen seconds and catches almost everything.
- Zoom to 100% and trace the full outline of the subject once.
- Check the hairline or the fuzziest edge specifically.
- Confirm the subject touches the ground somewhere, with a shadow if appropriate.
- Confirm the light direction in the background matches the light on the subject.
- Check that semi-transparent areas still look transparent.
- Confirm the perspective of any surface matches the camera angle of the subject.
- Compare against the original side by side to make sure you have not lost detail.
- Verify the export resolution matches what you uploaded.
Frequently asked questions
Can I really change a background for free with no watermark? Yes, but read the export terms rather than the headline. The most common catch is that removal is free while downloading the composite with a new background, or downloading at full resolution, is not. Test one image through to a saved file before planning a project around any tool.
Do I need to install anything? No. Browser-based AI editors handle this entirely online, which also means you are not limited by your laptop's specs. Mobile-first options exist if you want to edit straight from your camera roll.
Why does my cutout look flat against the new background? Almost always a lighting or shadow problem, not a cutout problem. Add a contact shadow, and match the brightness and warmth of the background to the subject.
What file should I upload? The original, highest-quality version available: JPEG, PNG or WebP, uncompressed by messaging apps. Screenshots and re-saved social media downloads give the AI less edge information to work with.
Is AI editing good enough for professional work? For background removal and replacement, generally yes, provided you check the edges and fix shadows. The remaining advantage of hand editing shows up on genuinely difficult subjects such as fine hair against a busy background, transparent objects, and compositing that has to survive close inspection at print size.
How many attempts should a generated background take? Plan for two or three. Prompting is iterative: generate, look at where the result disagrees with your subject's lighting or angle, add that detail to the prompt, and run it again. That loop is still far faster than masking by hand.