The fastest way to fix photo blemishes automatically is to run the image through an AI retouching tool that detects skin imperfections and reconstructs the area underneath, instead of cloning pixels by hand. In EditorAI you describe the fix in plain language, something like "remove the blemishes on the forehead and smooth the skin naturally," and the model repaints only those regions while keeping pores, shadows, and texture intact. That matters because the single biggest giveaway of an automated retouch is plastic-looking skin, and text-driven editing lets you control how far the correction goes without touching a single slider. For a batch of portraits, headshots, or product shots with dust and scratches, this turns a twenty-minute cleanup into a thirty-second one.
Below is how automatic blemish removal actually works, when it fails, and how to get results that look like a person edited them.
What Counts as a Blemish
"Blemish" is a broader category than most people assume, and the fix changes depending on what you are looking at.
- Skin imperfections: acne, spots, razor burn, temporary redness, under-eye shadows, flyaway hairs across the face.
- Surface defects: dust, lint, fingerprints, and scratches on products, packaging, or glossy surfaces.
- Sensor and lens artifacts: dust spots that appear in the same position across every frame from a shoot.
- Compression and noise artifacts: blotchy color in shadows, banding in skies, mushy detail from an over-compressed export.
Automatic tools handle the first three extremely well because they are small, isolated, and surrounded by clean reference pixels. The fourth category is not really a blemish problem, it is a quality problem, and it needs noise reduction or a better source file rather than spot removal.
Knowing which bucket you are in saves time. If you try to spot-heal compression noise, you will chase it forever.
How Automatic Blemish Removal Works
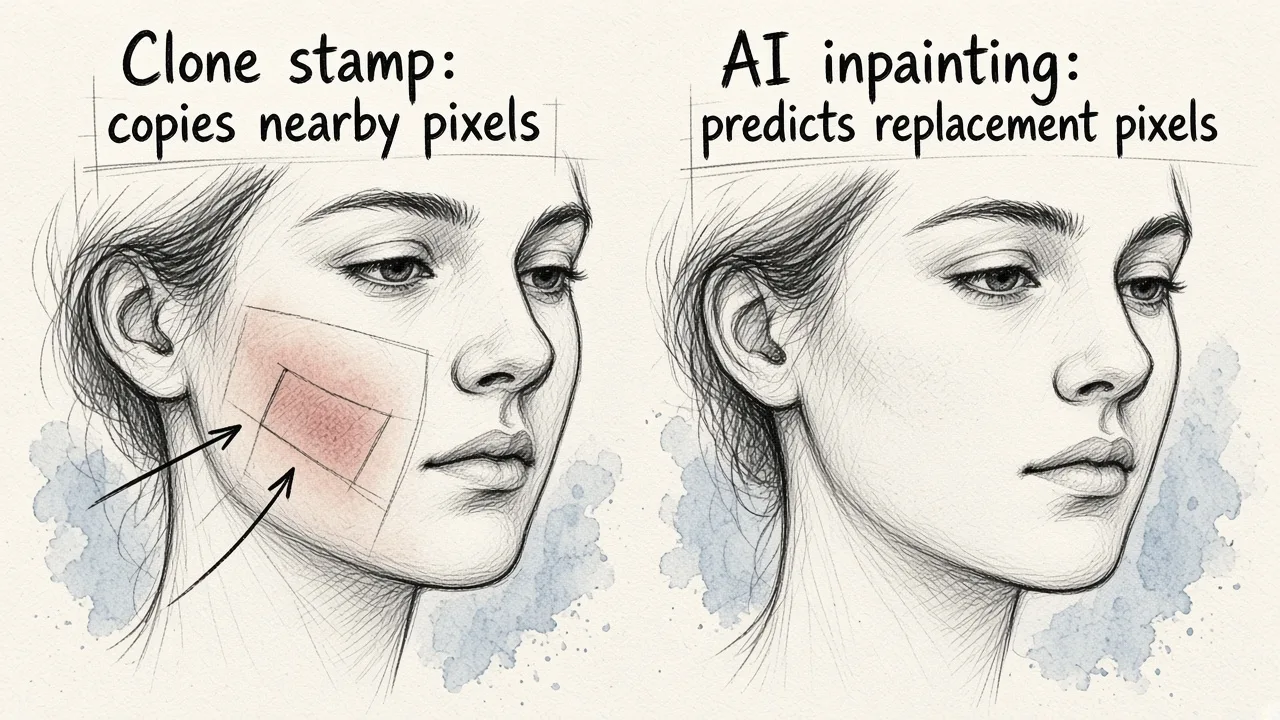
Older healing tools sampled a nearby patch of pixels and blended it over the flaw. That works when the surrounding area is uniform, and breaks down near edges, hairlines, nostrils, and the boundary between light and shadow, which is exactly where blemishes tend to sit.
Modern AI retouching uses inpainting instead. The model looks at the whole image, understands that it is looking at a cheek lit from the left with a certain skin tone and grain, then generates replacement pixels that match that context. It is not copying from elsewhere, it is predicting what should have been there. This is why AI tools handle a spot on the edge of a jawline or a scratch running across a product logo far better than a clone stamp ever did.
The practical consequence: you no longer need to pick a source point, set brush hardness, or feather a mask. You point at the problem, or describe it, and the tool resolves the rest.
The Five-Minute Workflow
Here is a sequence that works for almost any portrait or product image.
1. Start from the highest quality file you have. Retouching a heavily compressed JPEG forces the model to reconstruct detail that is already gone. Original camera files or the largest export you have will always give a cleaner result.
2. Fix global issues first. Exposure, white balance, and contrast change how visible a blemish is. A shot corrected for a warm cast may lose half its apparent redness before you remove anything.
3. Remove the distinct spots. Acne, dust, scratches, stray hairs. These are the flaws a viewer would notice in the first second. Work top to bottom so you do not miss anything.
4. Reduce, do not erase, the structural stuff. Under-eye shadows, laugh lines, skin texture variation. These are part of the face. Pull them back by half rather than deleting them, or the person stops looking like themselves.
5. Check at 100 percent and at thumbnail size. Most retouching mistakes only show up at one of those two zoom levels. Smoothing that looks great at full size often reads as waxy in a small profile picture.
6. Export at the right dimensions. A clean retouch loses its value if you scale it badly on the way out, so it is worth resizing without degrading the file as a separate deliberate step.
Doing It With Text Instead of Brushes
The reason text-based editing has taken over this task is that instructions carry intent in a way brush strokes cannot. "Remove the acne but keep the freckles" is a distinction a selection tool cannot express, but a language model can.
A few prompts that hold up in practice:
- "Remove the blemishes and spots on the skin while keeping natural texture and freckles."
- "Clean the dust and fingerprints off the product surface without changing the reflections."
- "Reduce under-eye shadows slightly, keep the lines visible."
- "Remove the stray hairs crossing the forehead."
- "Repair the scratch running across the bottom left corner."
Notice what these have in common: each one names the flaw and the limit. Unbounded instructions like "make the skin perfect" invite the model to smooth everything into mannequin territory. EditorAI responds to the constraint as much as the request, which is what keeps results usable for professional headshots rather than obviously filtered.
If you are retouching a headshot for LinkedIn or a company page, the constraint matters even more, because the audience already knows what a filtered photo looks like and discounts it accordingly.
Tools That Handle This, Ranked Honestly
There is no single right answer, it depends on volume and what else you need to do to the image.
| Tool type | Best for | Trade-off |
|---|---|---|
| EditorAI | Text-described retouching across many images, plus background and object work in the same pass | Prompt-driven, so you describe intent instead of manually masking |
| Desktop pro editors | Frame-by-frame retouching where you want absolute pixel control | Steep learning curve, slow at volume |
| Phone camera apps | Quick social posts, instant results | Heavy-handed smoothing, little control |
| Dedicated portrait plugins | High-end beauty and fashion work | Expensive, needs a host application |
| Free web spot removers | One-off fixes on small images | Resolution caps, watermarks, inconsistent quality |
If your work is one hero image a month and you already know a desktop editor, stay where you are. If you are processing dozens or hundreds of images and retouching is one of several things you need done, a platform approach wins on time. The same logic applies to anything at scale, which is why the criteria for choosing batch image editing software apply just as much to blemish work as they do to cropping or background swaps.
Handling Product Blemishes
Product photography has its own version of this problem. Dust on matte plastic, fingerprints on glass, scuffs on a packaging sample, lint on fabric. These show up in every shot from a session because they are physically on the object.
The efficient move is to clean the item before shooting, but that only gets you so far. Studio lights reveal specks the eye never noticed.
Two things make automatic cleanup work well here:
- Consistent lighting. If every shot is lit the same way, the model has a stable understanding of what a clean surface should look like, and repairs match across the set.
- Non-destructive order of operations. Clean the product first, then do background work. If you remove the background first, you lose the surrounding context the repair could have used.
Anyone building a catalog will hit this at volume, and the same setup discipline that makes automated product photos repeatable also makes blemish removal consistent across hundreds of SKUs.
Mistakes That Give Away an Automatic Retouch
Uniform skin. Real skin has pores, slight color variation, and directional texture. If a cheek is a single flat tone, you went too far.
Vanishing moles and scars. If a person has a distinguishing feature, leaving it in is usually the right call unless they asked otherwise. Removing it makes the photo not-quite-them in a way viewers register without knowing why.
Halos around repairs. A faint ring of different brightness around a removed spot means the blend failed. Undo it and try a smaller region.
Inconsistency across a set. In a batch of team headshots, one over-smoothed face stands out badly. Apply the same level of correction to everyone.
Repaired areas that lose grain. If the original image has visible noise, a perfectly clean patch will read as fake. Match the surrounding grain or dial back the repair.
The Short Version
Automatic blemish removal is now a solved problem for anyone who is not doing high-end beauty retouching. Pick the flaws that a viewer would actually notice, describe what you want removed and what you want kept, check the result at two zoom levels, and export properly. A tool like EditorAI compresses that into a few sentences of instruction, and the time you save goes back into shooting better source images, which is where the real quality gains live anyway.